Cleaning your vehicle can be a never-ending battle. Dust settles on dashboards, crumbs lodge in seat crevices and stains dig in to upholstery. Countless owners dedicate hours to cleaning their car or pay for costly detailing just to keep the inside smelling new and the outside gleaming.
The good news, however, is that this can be done with common car cleaning hacks much faster, easier, and cheaper. You can skip complicated tools or the help of professional car wash services in favor of simple items around your house and clever techniques to transform how you wash, dry, and detail your car. Using a toothbrush to clean air vents, removing stains with everyday products these hacks allow you to get professional level results home.
As of 2026, there is an increasing trend among drivers towards do-it-yourself (DIY) car cleaning solutions to keep their vehicles in good condition and cut costs. If you drive to office every day, a traveler or if you just want the car looking brand new, follow these tricks which we have sussed out for you and it could work wonders.
We have the best car cleaning hacks for interiors and exteriors, along with tackling those hard-to-reach areas, tools and techniques to use, plus pro tips from detailers.
By the time you are done reading, you’ll understand exactly how to invest your time and effort in order to keep that car looking clean, fresh and showroom new without breaking the bank.
In This Complete Guide, You’ll Discover
✔ Simple car cleaning hacks professionals use
✔ Best tools for DIY car detailing at home
✔ Easy methods to remove stains, dust, and odors
✔ Interior and exterior cleaning techniques
✔ Budget-friendly products for better results
✔ Common mistakes people make when cleaning cars
Why Car Cleaning Hacks Matter
Keeping your car clean is not just about aesthetics. Regular cleaning helps maintain the vehicle’s value, prevents interior damage, and creates a healthier driving environment.
Benefits include:
- Improved driving comfort
- Better resale value
- Reduced allergens and dust
- Protection of upholstery and surfaces
- Prevention of long-term stains
Professional detailing can cost $80–$300, but simple hacks allow you to achieve similar results at home.
Essential Tools for DIY Car Cleaning
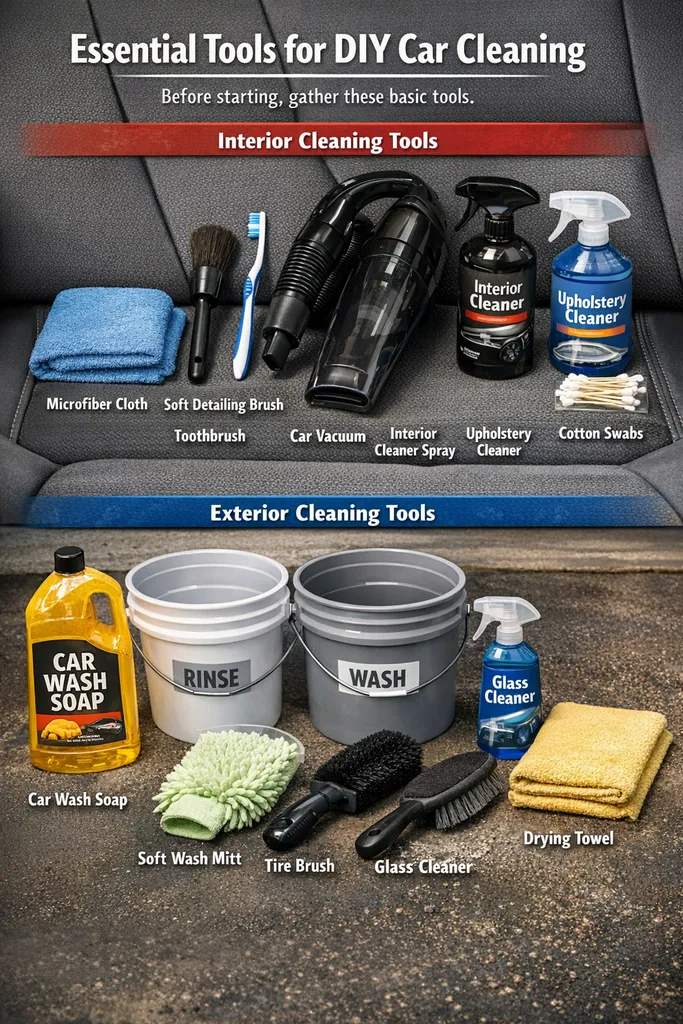
Before starting, gather these basic tools.
Interior Cleaning Tools
- Microfiber cloth
- Soft detailing brush
- Toothbrush
- Car vacuum
- Interior cleaner spray
- Upholstery cleaner
- Cotton swabs
Exterior Cleaning Tools
- Car wash soap
- Two buckets
- Soft wash mitt
- Tire brush
- Glass cleaner
- Drying towel
Top 10 Best Car Cleaning Hacks (Interior)
Here are the top 10 best car interior cleaning hacks, detailed with everything you need to know.
1. The Muffin Cup Cupholder Liner
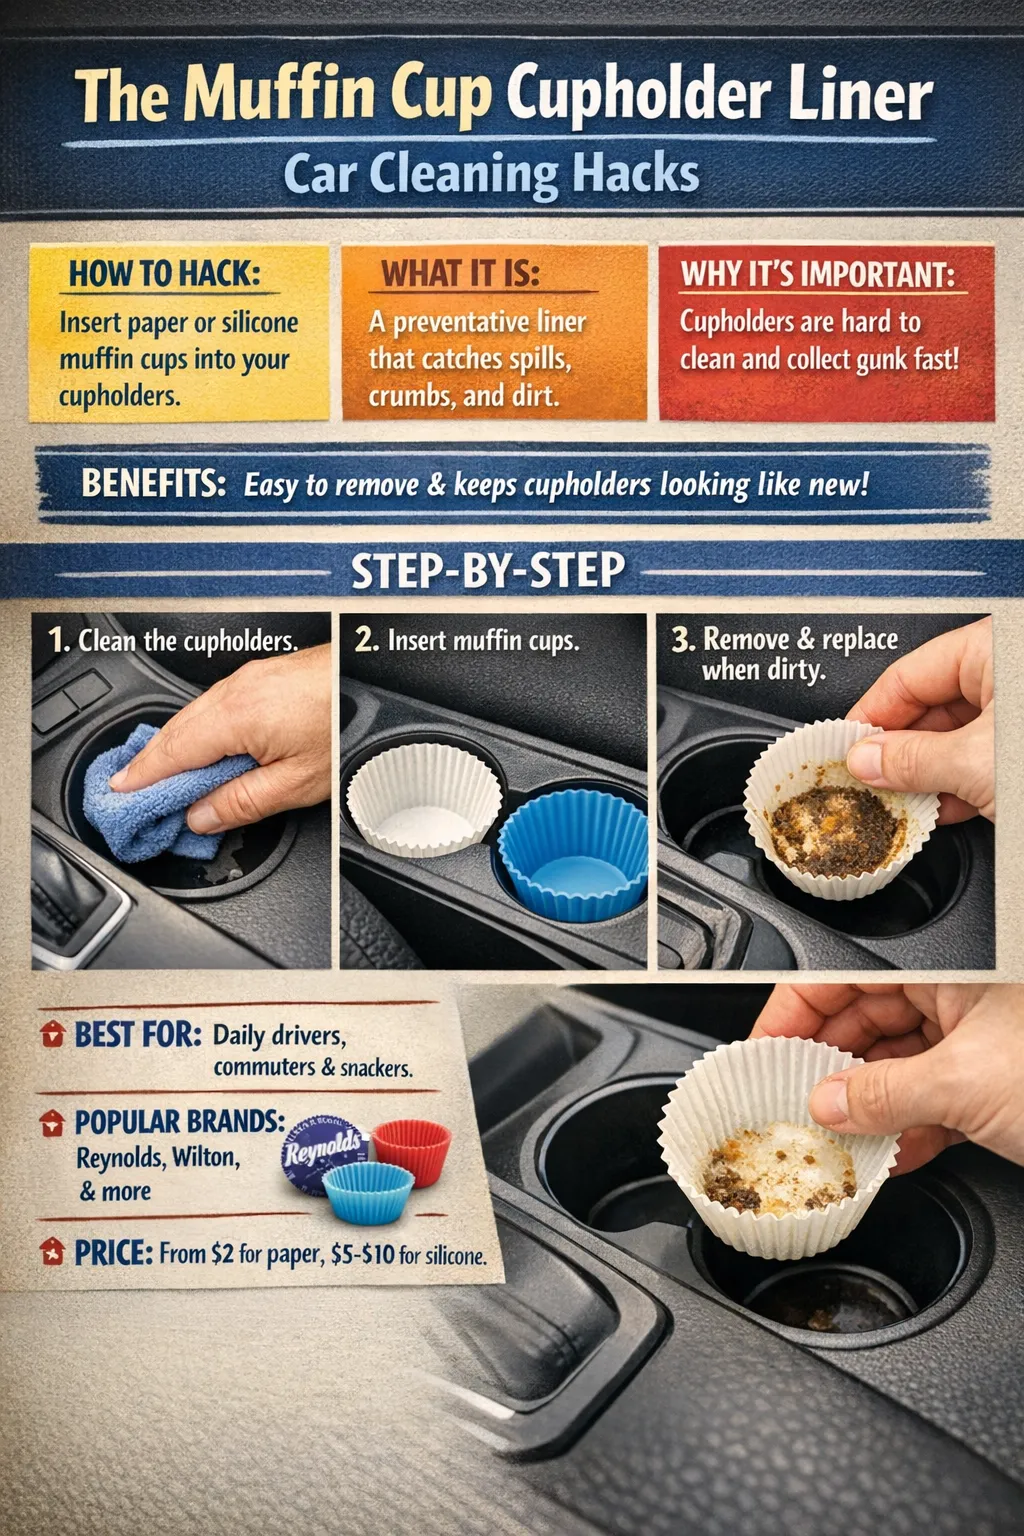
- How to Hack: Instead of scrubbing sticky residue, prevent it entirely by inserting paper or silicone muffin cups into your cupholders.
- What It Is: A preventative liner that catches spills, crumbs, and dirt before they reach the bottom of the cupholder.
- Why It’s Important: Cupholders are difficult to clean due to their shape and depth; they are prime real estate melted candy, and grime .
- Benefits: Makes cleaning as easy as lifting out the liner and washing it or throwing it away. It keeps the original cupholder surface looking new .
- Step-by-Step Instruction:
- Ensure your cupholders are clean and dry.
- Press a standard-sized paper or silicone muffin cup into each cupholder.
- When they get dirty, simply remove, replace, or wash them.
- Best For: Daily drivers, commuters, and anyone who eats or drinks in their car.
- Popular Brands: Reynolds (paper), Wilton (silicone), generic kitchen supply brands.
- Price (starts at approximately): $2 for a pack of paper cups; $5-$10 for reusable silicone.
2. The Toothbrush Crevice Cleaner
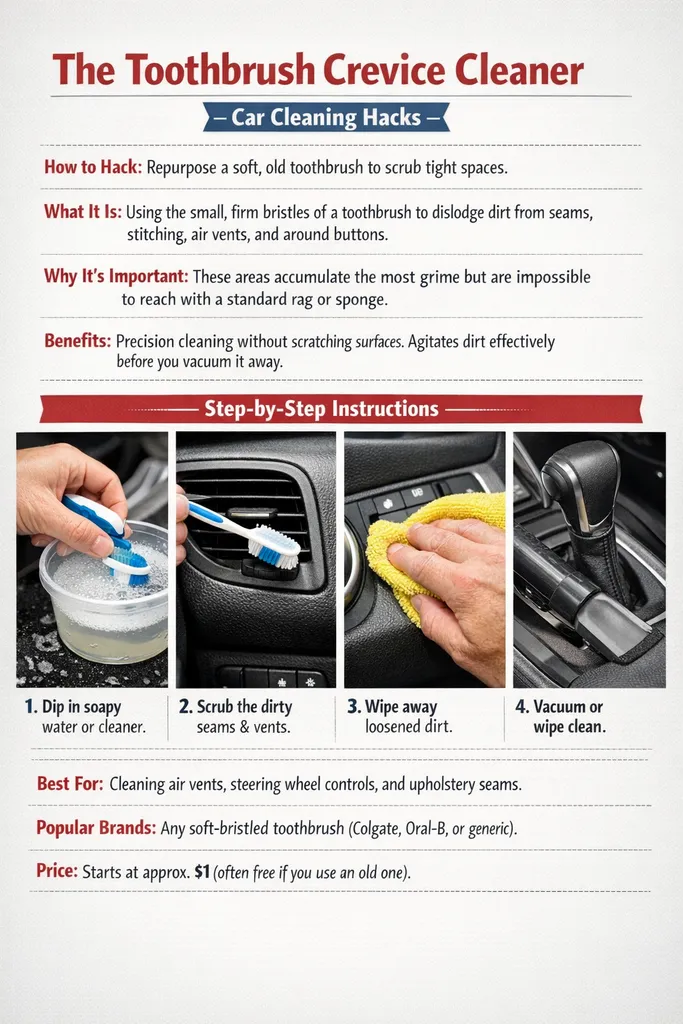
- How to Hack: Repurpose a soft, old toothbrush to scrub tight spaces.
- What It Is: Using the small, firm bristles of a toothbrush to dislodge dirt from seams, stitching, air vents, and around buttons .
- Why It’s Important: These areas accumulate the most grime but are impossible to reach with a standard rag or sponge .
- Benefits: Precision cleaning without scratching surfaces. It agitates dirt effectively before you vacuum it away .
- Step-by-Step Instruction:
- Dip the toothbrush in a mild soapy water or an all-purpose cleaner.
- Gently scrub the dirty seams, vent slats, or around the gear shift.
- Wipe away the loosened dirt with a microfiber cloth or vacuum it up.
- Best For: Cleaning air vents, steering wheel controls, and upholstery seams.
- Popular Brands: Any soft-bristled toothbrush (Colgate, Oral-B, or generic).
- Price (starts at approximately): $1 (often free if you use an old one).
3. The Baking Soda Odor Eliminator
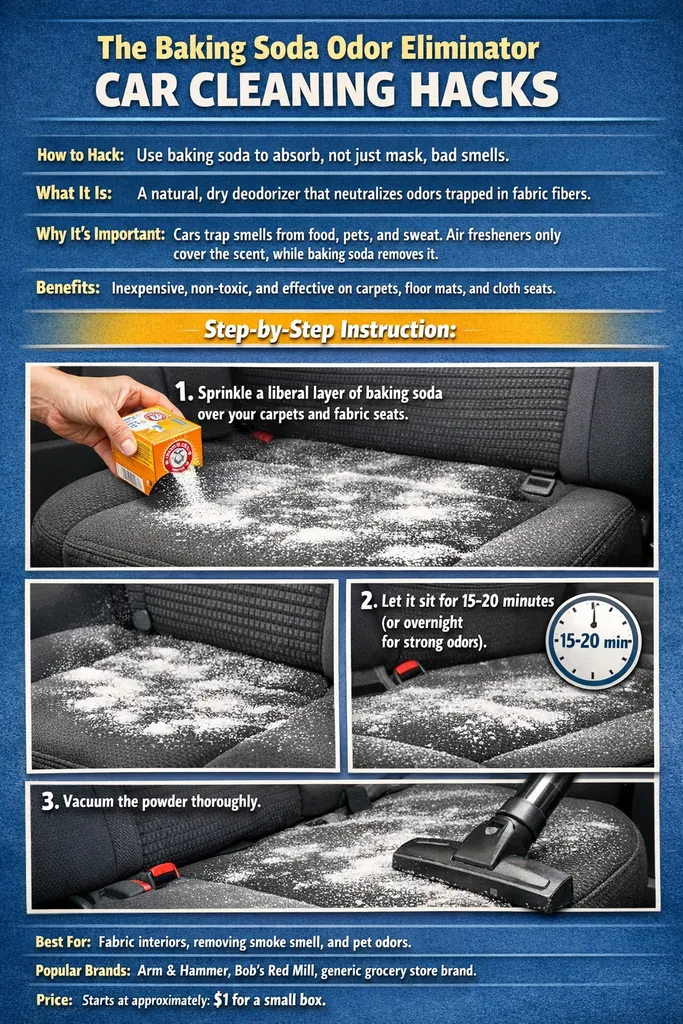
- How to Hack: Use baking soda to absorb, not just mask, bad smells.
- What It Is: A natural, dry deodorizer that neutralizes odors trapped in fabric fibers .
- Why It’s Important: Cars trap smells from food, pets, and sweat. Air fresheners only cover the scent, while baking soda removes it .
- Benefits: Inexpensive, non-toxic, and effective on carpets, floor mats, and cloth seats .
- Step-by-Step Instruction:
- Best For: Fabric interiors, removing smoke smell, and pet odors.
- Popular Brands: Arm & Hammer, Bob’s Red Mill, generic grocery store brand.
- Price (starts at approximately): $1 for a small box.
4. The Squeegee Pet Hair Remover
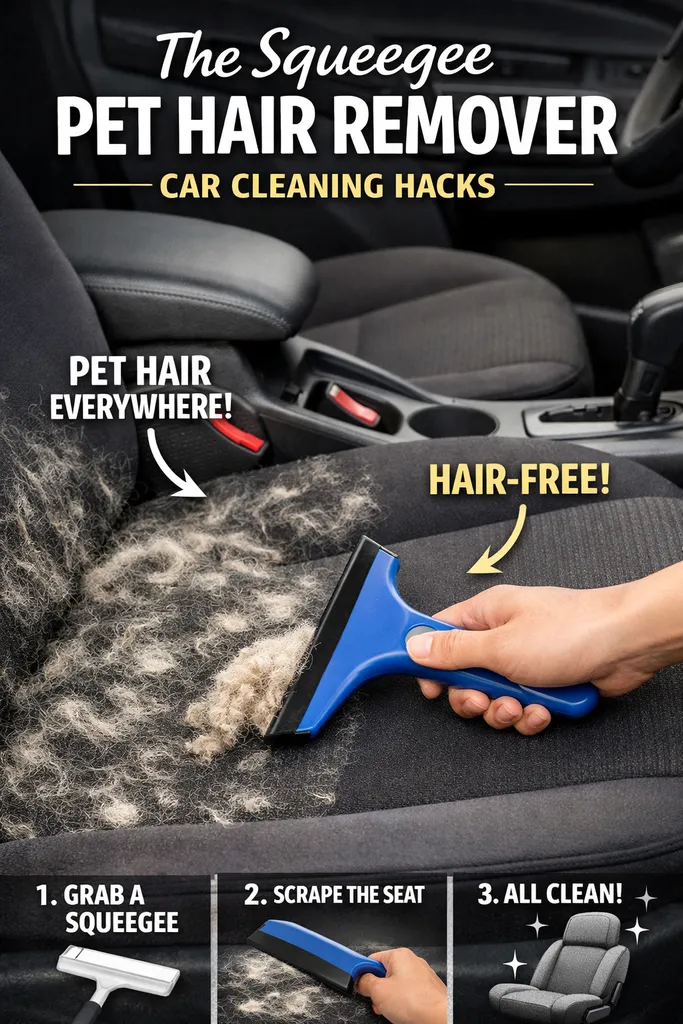
- How to Hack: Use a rubber squeegee or a rubber glove to remove embedded pet hair.
- What It Is: A rubber tool that creates static electricity and friction to gather hair into piles for easy collection .
- Why It’s Important: Pet hair digs deep into carpet and fabric, and vacuums often miss it. It can aggravate allergies.
- Benefits: Faster than lint rollers for large areas. It lifts hair without damaging fabric .
- Step-by-Step Instruction:
- Best For: Pet owners, fabric seats, and cargo areas.
- Popular Brands: Ettore (squeegee), Black Diamond (squeegee), kitchen dish gloves.
- Price (starts at approximately): $5 for a squeegee; $2 for gloves.
5. The Foam Paintbrush Vent Duster
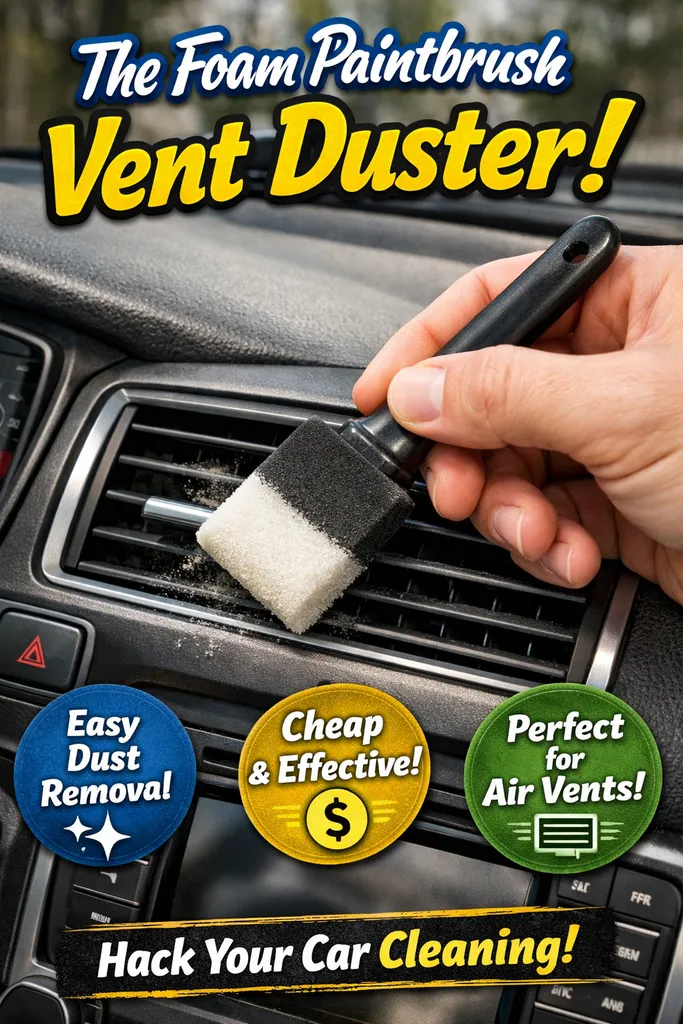
- How to Hack: Clean delicate air vent slats with a cheap foam paintbrush.
- What It Is: A soft, wedge-shaped foam brush that fits between vent fins to trap and remove dust .
- Why It’s Important: Dusty vents blow particles into the cabin air and look unsightly. Liquid cleaners can damage vent electronics if they drip inside .
- Benefits: Static-free, lint-free, and disposable. It reaches deep into vents without scratching.
- Step-by-Step Instruction:
- Best For: Dashboard air vents and delicate trim pieces.
- Popular Brands: Purdy, Wooster, or generic hardware store brand.
- Price (starts at approximately): $1-$3 for a multi-pack.
6. The DIY Vinegar Glass Cleaner
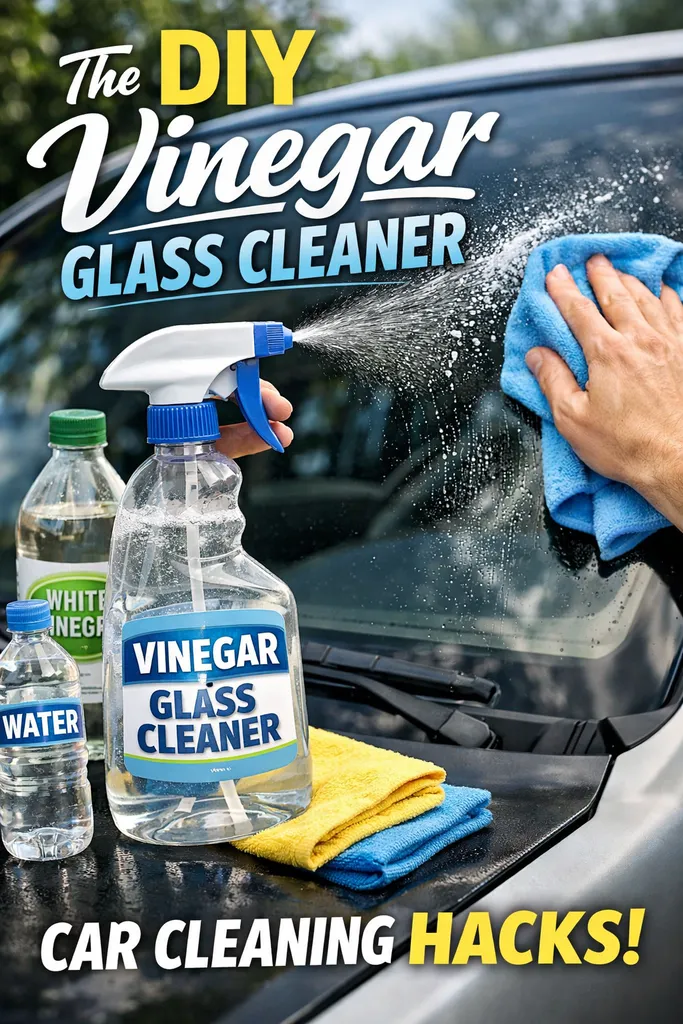
- How to Hack: Mix your own streak-free window cleaner to avoid ammonia-based fumes.
- What It Is: A simple solution of distilled water and white vinegar that cuts through window haze and fingerprints .
- Why It’s Important: Ammonia-based cleaners can damage window tint and some dashboard materials .
- Benefits: Extremely cheap, eco-friendly, and leaves glass crystal clear without residue.
- Step-by-Step Instruction:
- Best For: Interior windows, mirrors, and navigation screens (spray on cloth first).
- Popular Brands: Heinz (vinegar), generic grocery store brand.
- Price (starts at approximately): $2 for a large jug of vinegar (makes multiple bottles).
7. The Silicone Scrubber for Cup Holders
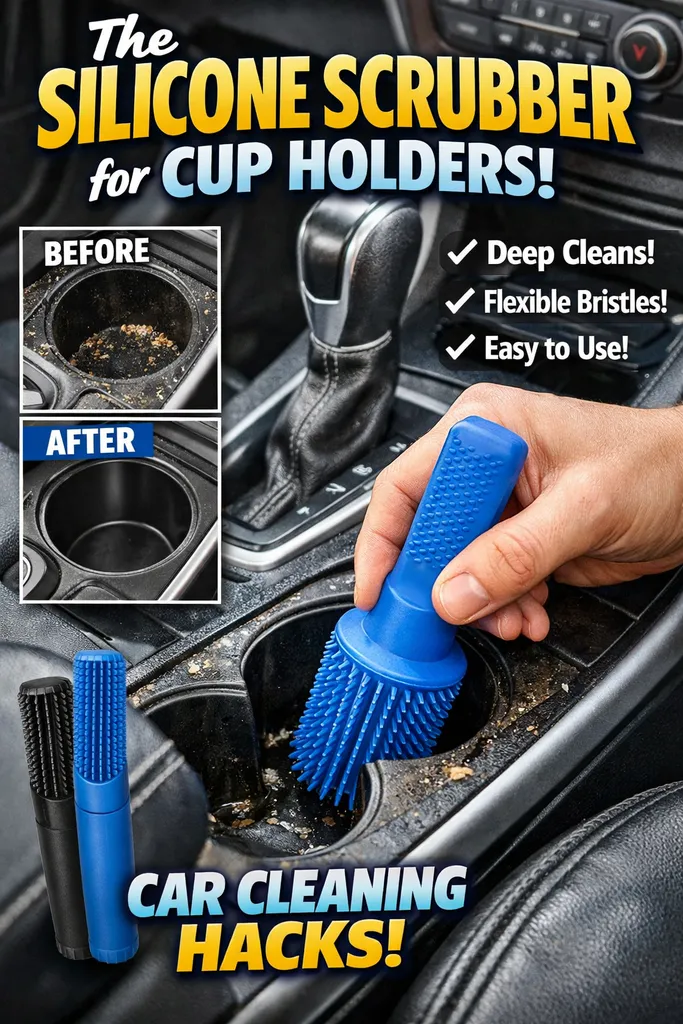
- How to Hack: Use a sock over a socket or a small jar to scrub deep cup holders.
- What It Is: A DIY cleaning tool that applies even pressure to the curved walls of a cupholder .
- Why It’s Important: Cup holders are too narrow for most cleaning tools, leading to a buildup of sticky residue .
- Benefits: Effectively scrubs the entire surface without you having to jam your fingers in.
- Step-by-Step Instruction:
- Best For: Deep-set cup holders and small storage bins.
- Popular Brands: Any clean sock or microfiber towel; Craftsman (socket).
- Price (starts at approximately): Free (using household items).
8. The Dryer Sheet Static Repeller
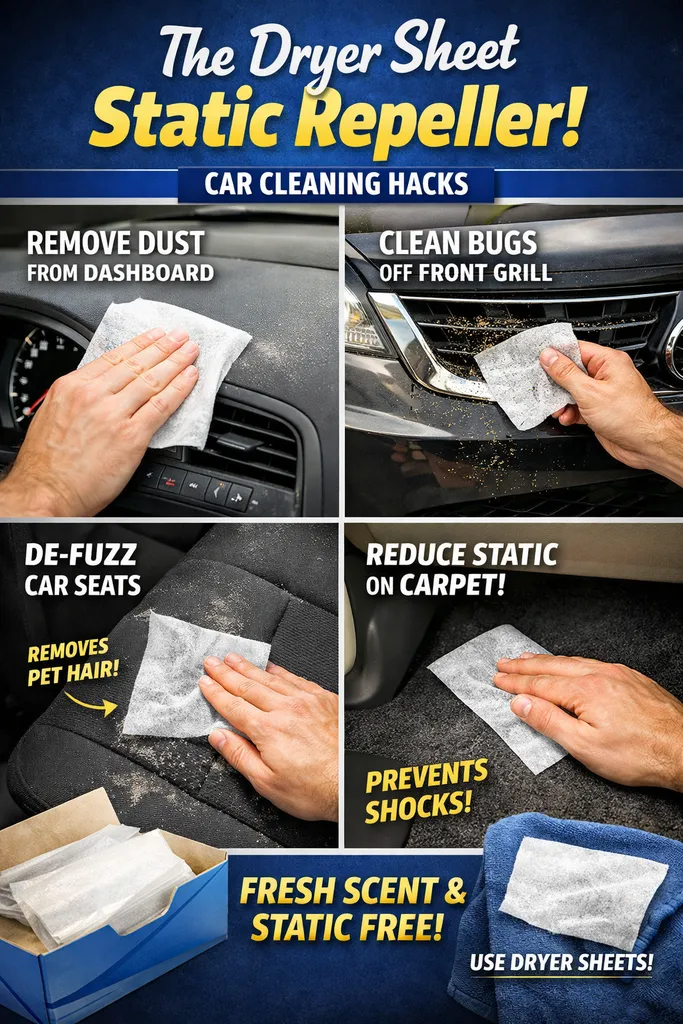
- How to Hack: Tuck dryer sheets under seats to deodorize and repel dust.
- What It Is: Using used or new dryer sheets to absorb moisture and odors while reducing static cling on carpets .
- Why It’s Important: Moisture from shoes can lead to musty smells. Static attracts more dust and hair to floor mats.
- Benefits: Leaves a fresh scent, reduces future dust accumulation, and is a great way to reuse sheets .
- Step-by-Step Instruction:
- Best For: Odor control in humid climates and reducing dust on dashboards.
- Popular Brands: Bounce, Downy, Gain.
- Price (starts at approximately): $5 for a large box (often repurposed after use).
9. The Olive Oil Dashboard Shine
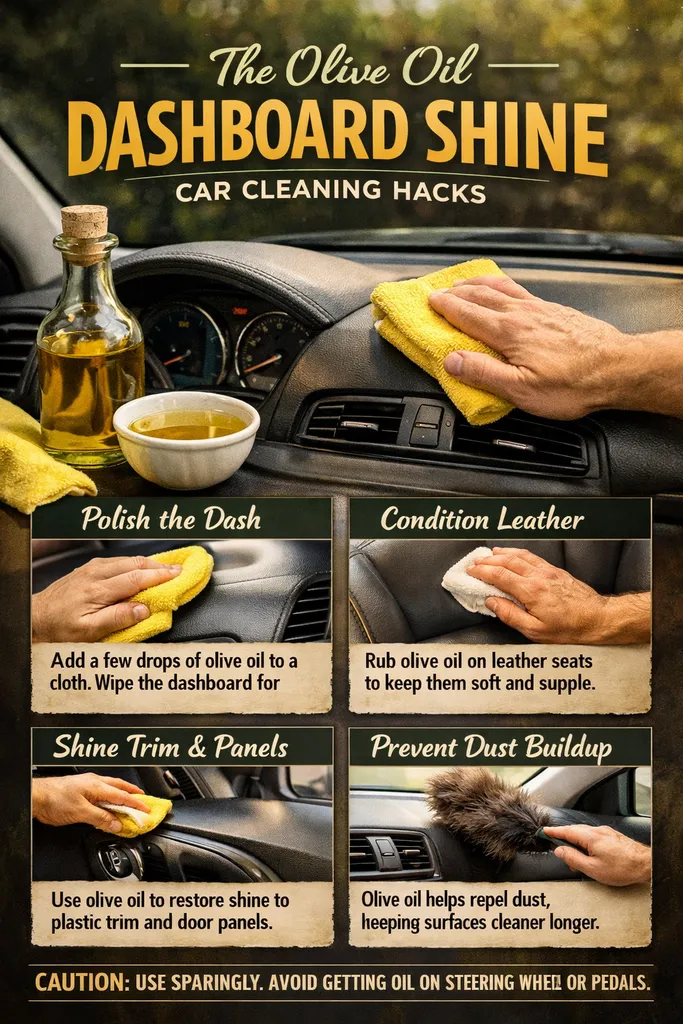
- How to Hack: Condition your dashboard with a tiny drop of olive oil.
- What It Is: A natural, chemical-free alternative to commercial “dash shine” products .
- Why It’s Important: UV rays can dry out and crack dashboards. Some commercial products leave a greasy film that causes glare .
- Benefits: Provides a natural, non-greasy shine and adds a protective layer to prevent cracking .
- Step-by-Step Instruction:
- Put a tiny drop of olive oil on a soft microfiber cloth. (Less is more!)
- Wipe it onto a clean dashboard.
- Buff immediately with a dry part of the cloth to remove any excess.
- Best For: Adding a protective, low-sheen finish to vinyl and plastic dashboards.
- Popular Brands: Bertolli, Filippo Berio, or any grocery store brand.
- Price (starts at approximately): $4 for a standard bottle (lasts for years of detailing).
10. The All-Purpose Cleaner (APC) Dilution Hack
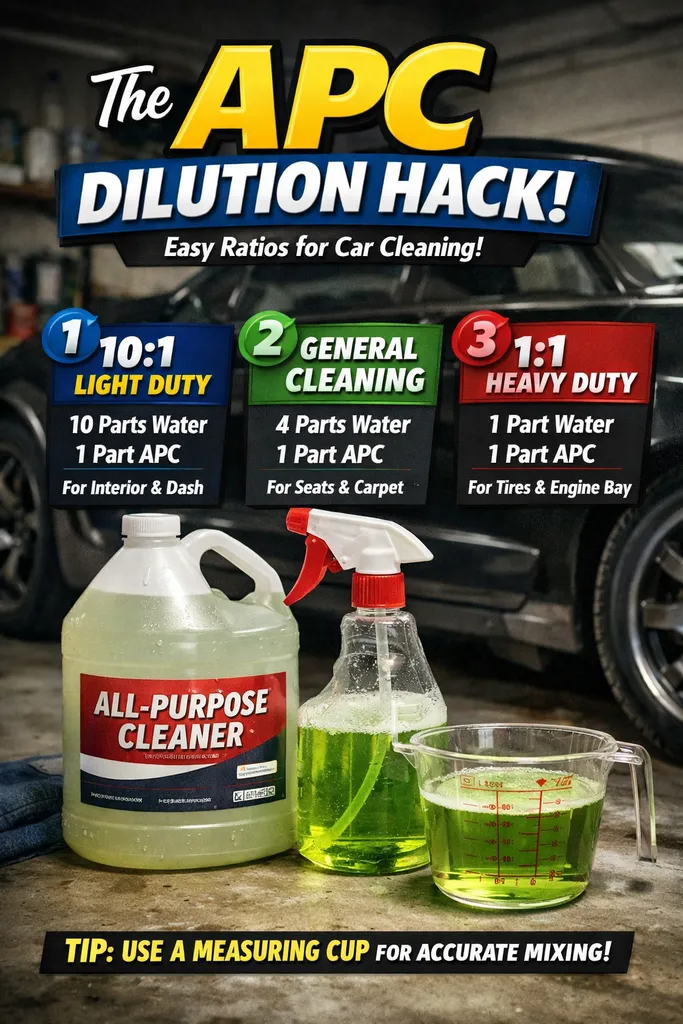
- Price (starts at approximately): $5 for a ready-to-use bottle; $11+ for concentrate
- How to Hack: Buy concentrated All-Purpose Cleaner (APC) and dilute it yourself for different jobs.
- What It Is: A strong cleaning concentrate that you mix with water at different ratios depending on the task .
- Why It’s Important: It saves money and storage space compared to buying ten different specialized sprays. It is the standard for professional detailers .
- Benefits: One bottle can clean carpets (heavy dilution), glass (light dilution), and leather (specific pH-balanced dilution).
- Step-by-Step Instruction:
- Purchase a quality APC concentrate like VP Cleanse-It or Armor All .
- Fill a spray bottle with water and add the amount of concentrate per the instructions (e.g., 10:1 for heavy soil, 20:1 for maintenance).
- Label the bottle and use it on surfaces from floor mats to door panels.
- Best For: The entire interior—carpets, upholstery, plastics, and vinyl .
- Popular Brands: VP Cleanse-It, Armor All, Autoglym, Chemical Guys .
Top 10 Best Car Cleaning Hacks (Exterior)
Here are the top 10 best exterior car cleaning hacks, detailed with everything you need to know.
1. The WD-40 Bug Remover
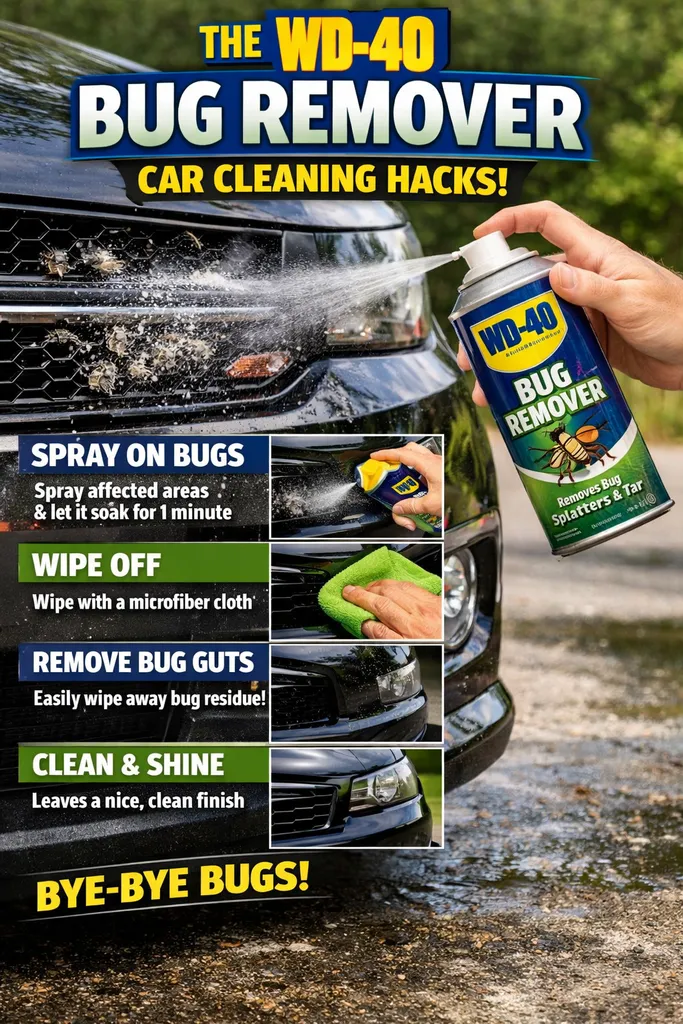
- How to Hack: Spray WD-40 on bug splatters and baked-on residue to instantly loosen them .
- What It Is: A water-displacing spray that breaks down the proteins in bug guts, making them easy to wipe away without heavy scrubbing .
- Why It’s Important: Bug splatters are acidic and can eat into your car’s clear coat and paint if left on too long, causing permanent damage .
- Benefits: It saves you from vigorous scrubbing that can scratch the paint, and it often works where specialty bug removers fail .
- Step-by-Step Instruction:
- Ensure the car surface is cool and not in direct sunlight.
- Spray a small amount of WD-40 directly onto the bug splatters.
- Let it sit for 1-2 minutes to penetrate and soften the residue .
- Wipe away gently with a soft microfiber cloth. Wash the area with car soap and water afterward to remove any WD-40 residue.
- Best For: Removing stubborn bug splatters from bumpers, grilles, and mirrors.
- Popular Brands: WD-40.
- Price (starts at approximately): $4 for a standard can.
2. The Baking Soda Paste for Stubborn Stains
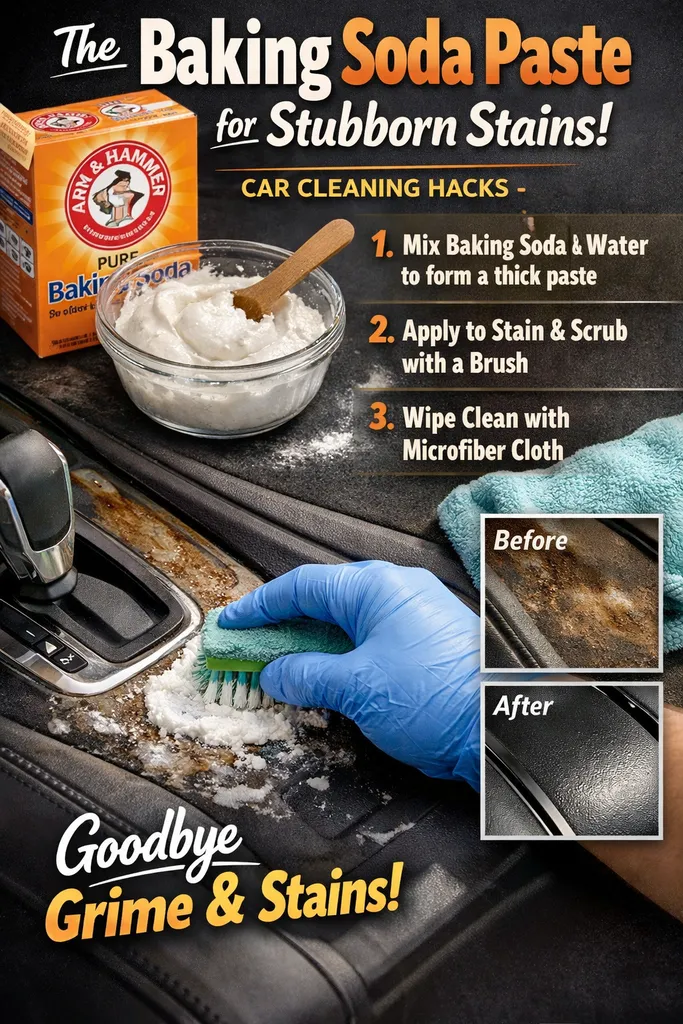
- How to Hack: Mix baking soda with water to create a gentle, non-abrasive paste for scrubbing tough spots .
- What It Is: A mild alkaline scrubber that helps dissolve and lift stuck-on grime, bird droppings, and tree sap without scratching the clear coat .
- Why It’s Important: Bird droppings and tree sap are highly acidic and can etch into the paint, causing permanent stains if not removed promptly .
- Benefits: It’s a cheap, non-toxic alternative to harsh chemical cleaners that effectively removes contaminants safely .
- Step-by-Step Instruction:
- Mix three parts baking soda with one part water in a small bowl to form a thick paste (similar to toothpaste) .
- Apply the paste to the affected area with a soft, damp microfiber cloth .
- Gently rub in a circular motion with light pressure .
- Let it sit for a minute or two, then rinse thoroughly with clean water and dry with a microfiber towel .
- Best For: Removing bird droppings, tree sap, and dried-on bugs.
- Popular Brands: Arm & Hammer, generic grocery store brand.
- Price (starts at approximately): $1 for a small box.
3. The Toothpaste Headlight Restorer
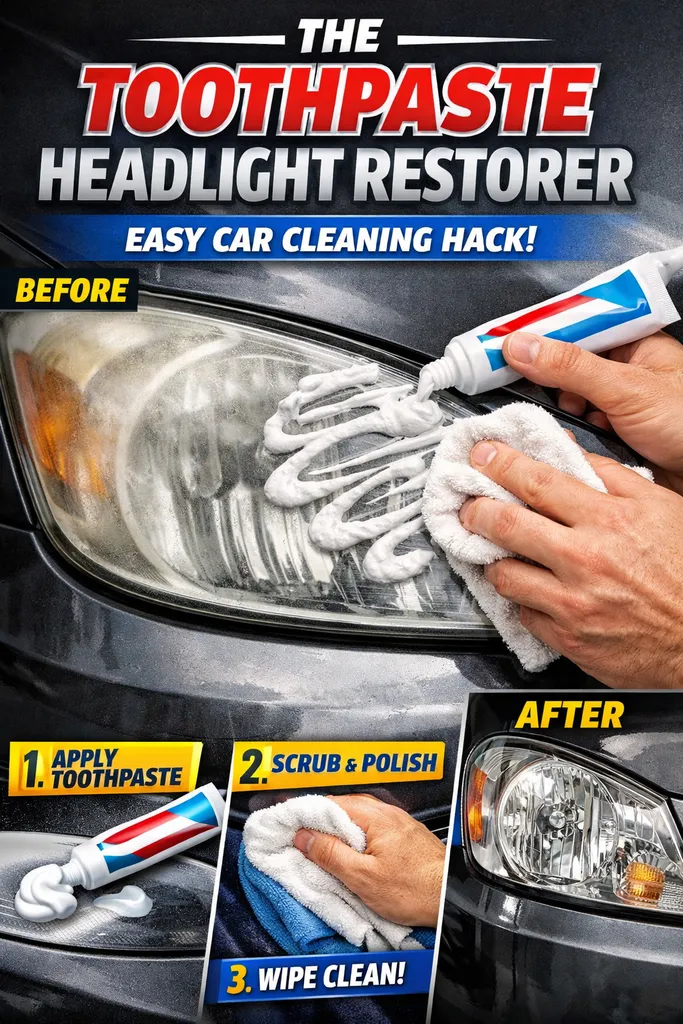
- How to Hack: Use whitening toothpaste to polish and restore clarity to foggy, yellowed headlights .
- What It Is: The mild abrasive compounds in toothpaste act as a gentle polishing agent to sand away the oxidized, from headlight lenses .
- Why It’s Important: Cloudy headlights significantly reduce nighttime visibility, making driving dangerous. They the car’s overall appearance .
- Benefits: It’s a pennies-on-the-dollar solution compared to expensive restoration kits or professional replacement, and it can be done in minutes .
- Step-by-Step Instruction:
- Clean the headlights with soap and water and tape off the surrounding paint to protect it .
- Apply a small amount of toothpaste (preferably one with baking soda) to a damp cloth or an old toothbrush .
- Rub the toothpaste onto the headlight in firm, circular motions for 2-5 minutes .
- Rinse thoroughly with water and wipe dry to see the restored clarity.
- Best For: Restoring clear plastic headlight lenses.
- Popular Brands: Colgate, Crest, Arm & Hammer (toothpastes with baking soda).
- Price (starts at approximately): $2 for a standard tube.
4. The Vinegar and Water Glass Cleaner
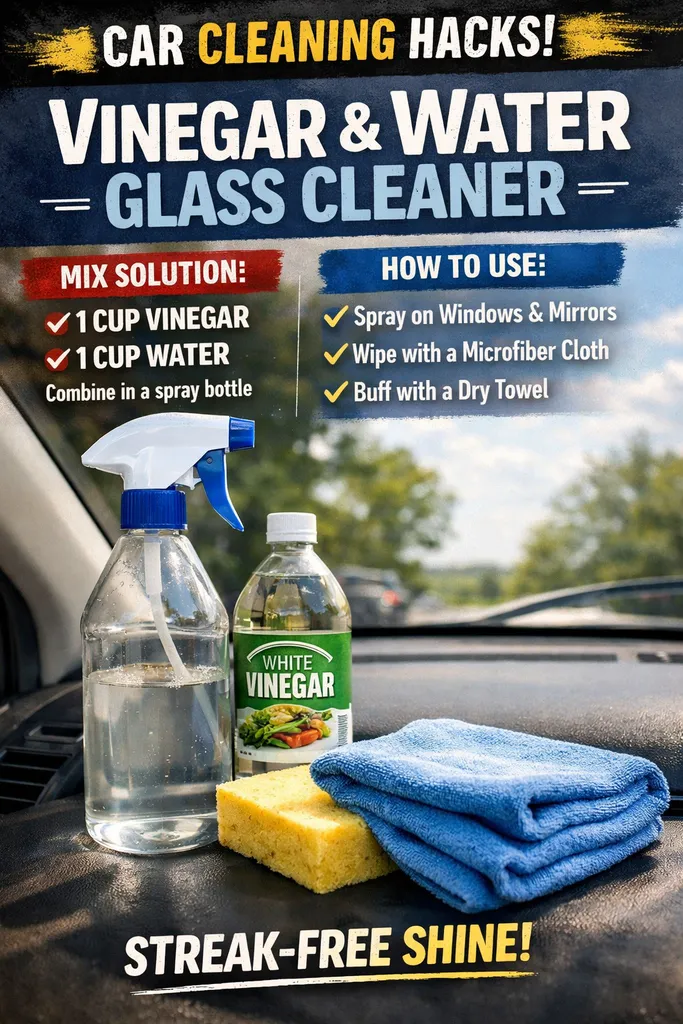
- How to Hack: Mix distilled white vinegar and water for a streak-free, ammonia-free glass cleaner .
- What It Is: A simple, acidic solution that cuts through grease, road film, and water spots on windows and mirrors .
- Why It’s Important: Ammonia-based cleaners can damage aftermarket window tint and rubber seals. Vinegar is a safe, effective alternative .
- Benefits: Extremely inexpensive, eco-friendly, and leaves glass crystal clear without streaks or harmful fumes .
- Step-by-Step Instruction:
- Best For: Exterior windows, mirrors, and windshields.
- Popular Brands: Heinz, or any generic grocery store brand of white vinegar.
- Price (starts at approximately): $2 for a large jug (makes multiple bottles).
5. The Hair Conditioner Shine Booster
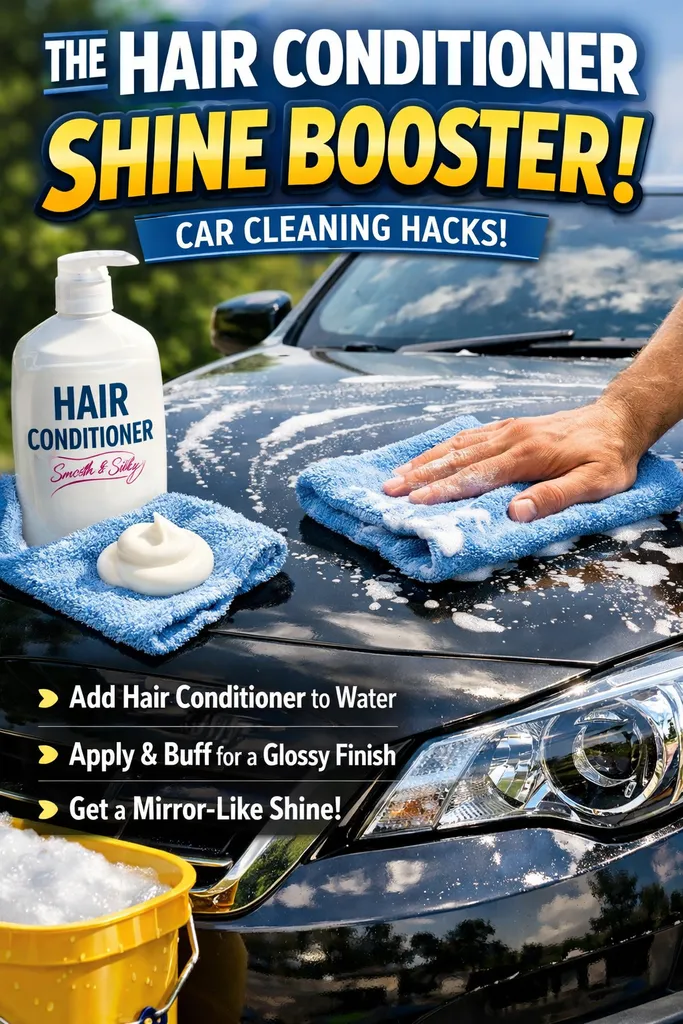
- How to Hack: After washing, apply a hair conditioner that contains lanolin to your car’s paint for a deep, wet-looking shine .
- What It Is: Lanolin is a natural wax (similar to carnauba wax) that conditions the paint, adds depth, and creates a water-repellent surface .
- Why It’s Important: This adds a protective layer that makes future washes easier and helps maintain the paint’s gloss between professional waxings.
- Benefits: It’s a great way to use up leftover conditioner, and it provides a quick, inexpensive “wax-like” finish.
- Step-by-Step Instruction:
- Best For: Adding gloss and a protective layer to painted surfaces.
- Popular Brands: Aussie, Garnier Fructis (look for “with lanolin”).
- Price (starts at approximately): $3 for a standard bottle.
6. The Rubbing Alcohol Wiper Cleaner
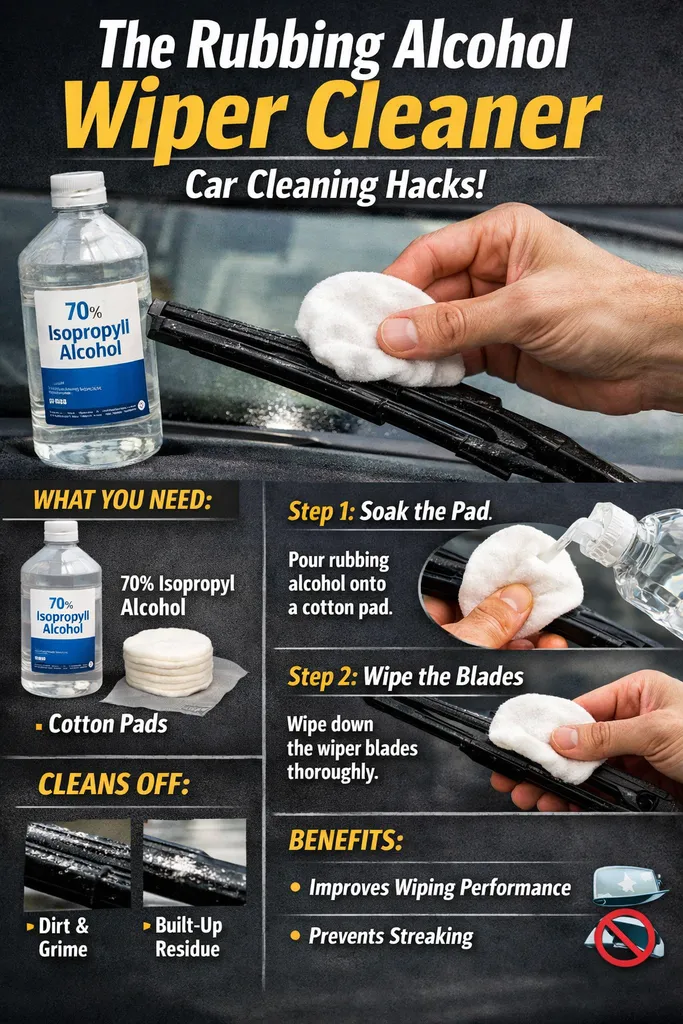
- How to Hack: Clean your windshield wiper blades with rubbing alcohol to remove built-up grime and oil .
- What It Is: A solvent that dissolves and lifts dirt, oil, and rubber residue from the wiper blade’s edge.
- Why It’s Important: Dirty wiper blades can’t make proper contact with the glass, leading to streaks, squeaking, and reduced visibility in rain .
- Benefits: This simple hack can extend the life of your wiper blades and restore their effectiveness, saving you money on replacements.
- Step-by-Step Instruction:
- Best For: Maintaining windshield wipers and preventing streaks.
- Popular Brands: Generic drugstore or supermarket brand isopropyl alcohol.
- Price (starts at approximately): $2 for a standard bottle.
7. The Clay Bar for a Smooth Finish
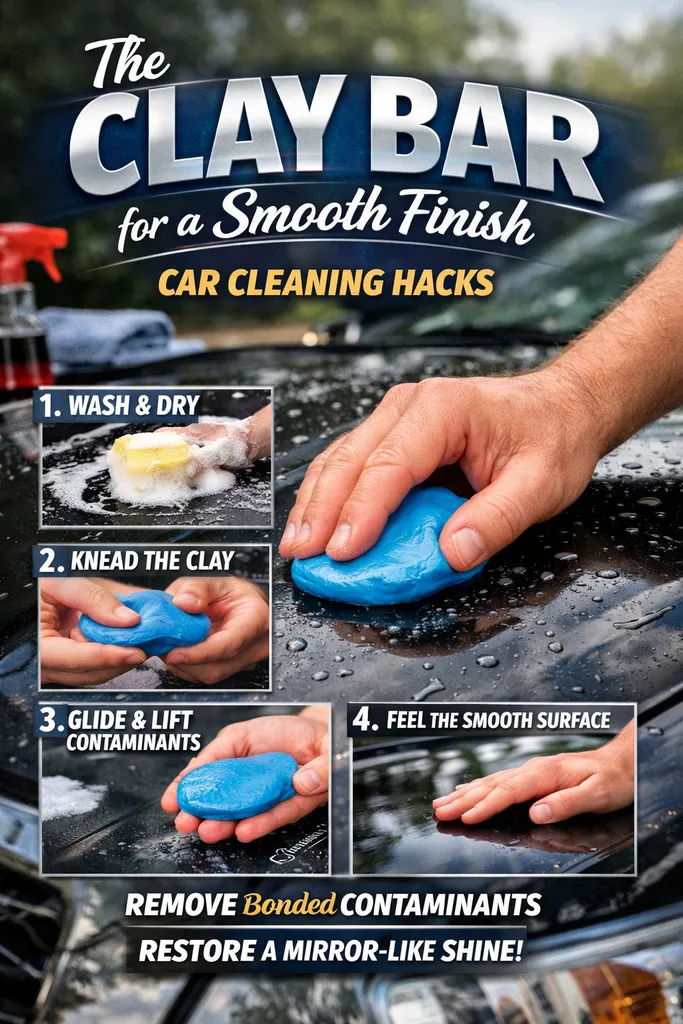
- How to Hack: Use a clay bar with a lubricant to remove bonded surface contaminants that washing can’t .
- What It Is: A pliable resin bar that glides over the paint, picking up microscopic particles like industrial fallout, overspray, and embedded dirt .
- Why It’s Important: These contaminants make the paint feel rough and can dull the finish. Claying is the only way to get a truly smooth surface, essential before waxing or sealing .
- Benefits: Restores a smooth, glass-like feel to the paint, enhances gloss, and ensures wax or sealant bonds properly for longer protection .
- Step-by-Step Instruction:
- Wash and dry the car thoroughly .
- Spray a small section of the car with a clay lubricant .
- Gently glide the clay bar back and forth over the lubricated area using light pressure. You’ll feel it glide smoothly as it picks up dirt .
- Wipe off any residue with a microfiber towel. Repeat for the entire car, kneading the clay to expose a clean surface as it gets dirty .
- Apply a coat of wax or sealant to protect the freshly cleaned paint .
- Best For: Paint decontamination before waxing, polishing, or sealing.
- Popular Brands: Mothers, Meguiar’s, Chemical Guys.
- Price (starts at approximately): $15 for a basic clay bar kit with lubricant.
8. The Baby Shampoo Car Wash
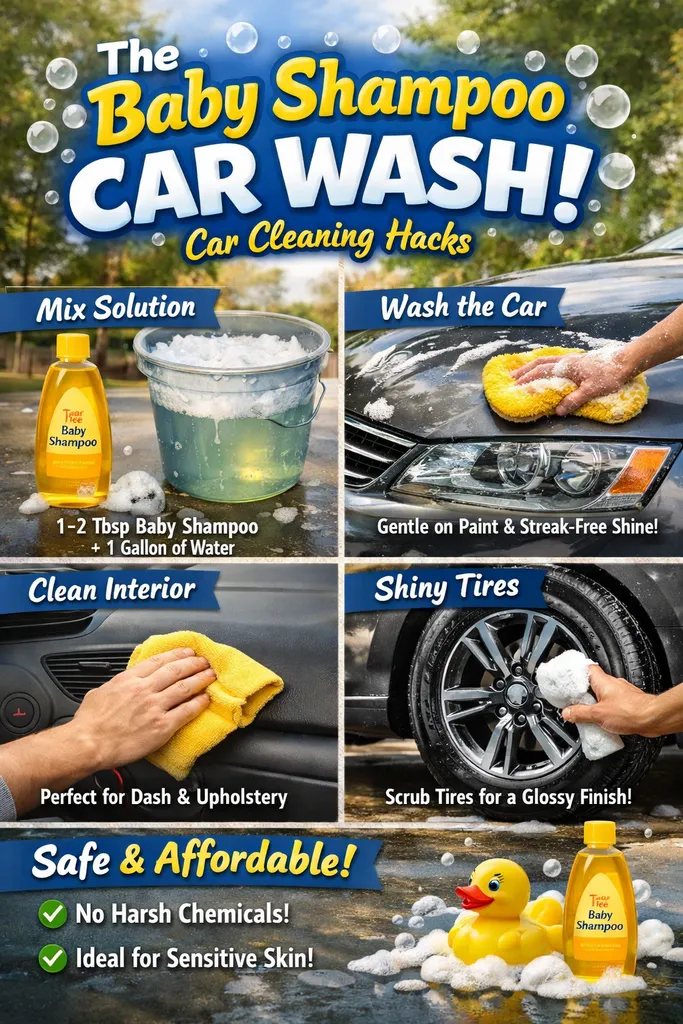
- How to Hack: Use a gentle, tear-free baby shampoo as a substitute for expensive car wash soap .
- What It Is: A mild, pH-balanced liquid soap that is gentle on skin and equally gentle on your car’s wax and clear coat .
- Why It’s Important: Harsh dish soaps strip away protective wax. Baby shampoo effectively lifts dirt without damaging the paint or removing existing wax layers .
- Benefits: It’s much cheaper than specialized car soap, readily available, and produces a gentle, effective cleaning solution.
- Step-by-Step Instruction:
- Fill a bucket with water and add a small amount of baby shampoo (about a tablespoon per gallon).
- Use a microfiber wash mitt to wash the car, starting from the top and working your way down .
- Rinse the mitt frequently in a separate bucket of clean water to avoid scratching the paint with dirt (the two-bucket method) .
- Rinse the car thoroughly with clean water and dry with a microfiber towel.
- Best For: A gentle, effective, and budget-friendly main wash.
- Popular Brands: Johnson’s, Aveeno Baby.
- Price (starts at approximately): $3 for a standard bottle.
9. The Washing Powder Alloy Wheel Cleaner
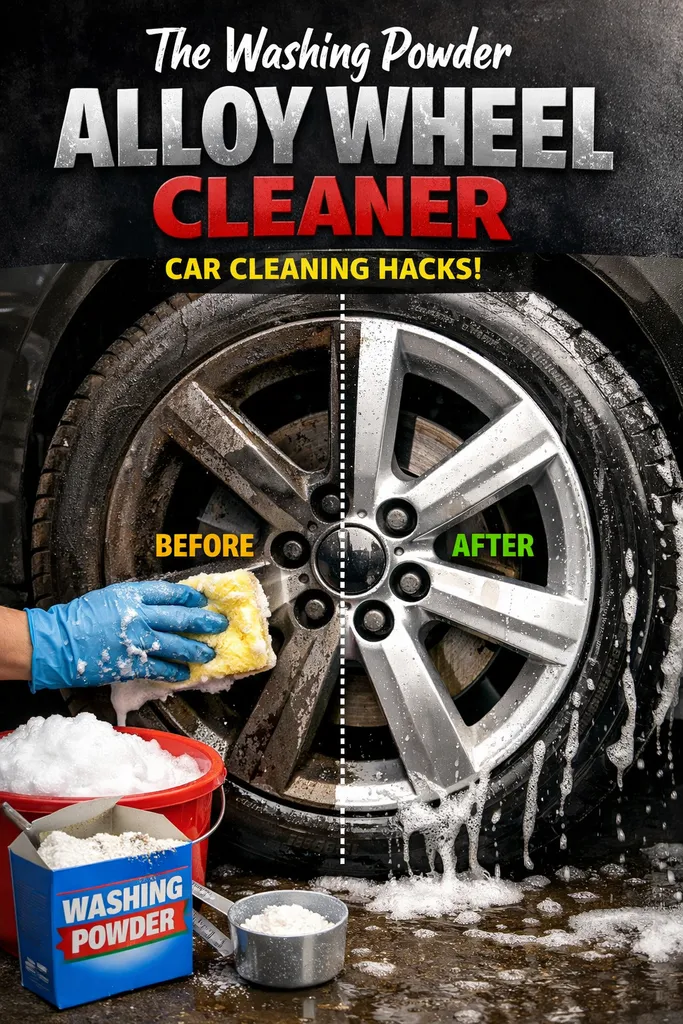
- How to Hack: Create a paste from laundry washing powder and water to scrub stubborn brake dust from alloy wheels .
- What It Is: A mild alkaline cleaner that helps break down baked-on brake dust and road grime without the harsh acids found in some dedicated wheel cleaners .
- Why It’s Important: Brake dust is corrosive and can permanently pit and damage the clear coat on your alloy wheels if left to build up .
- Benefits: This is a powerful yet cost-effective way to get wheels sparkling clean using a common household item.
- Step-by-Step Instruction:
- Best For: Deep-cleaning alloy wheels.
- Popular Brands: Persil, Tide, or any generic laundry powder.
- Price (starts at approximately): $5-$10 for a large box (lasts for many cleaning sessions).
10. The Magic Eraser for Minor Scuffs
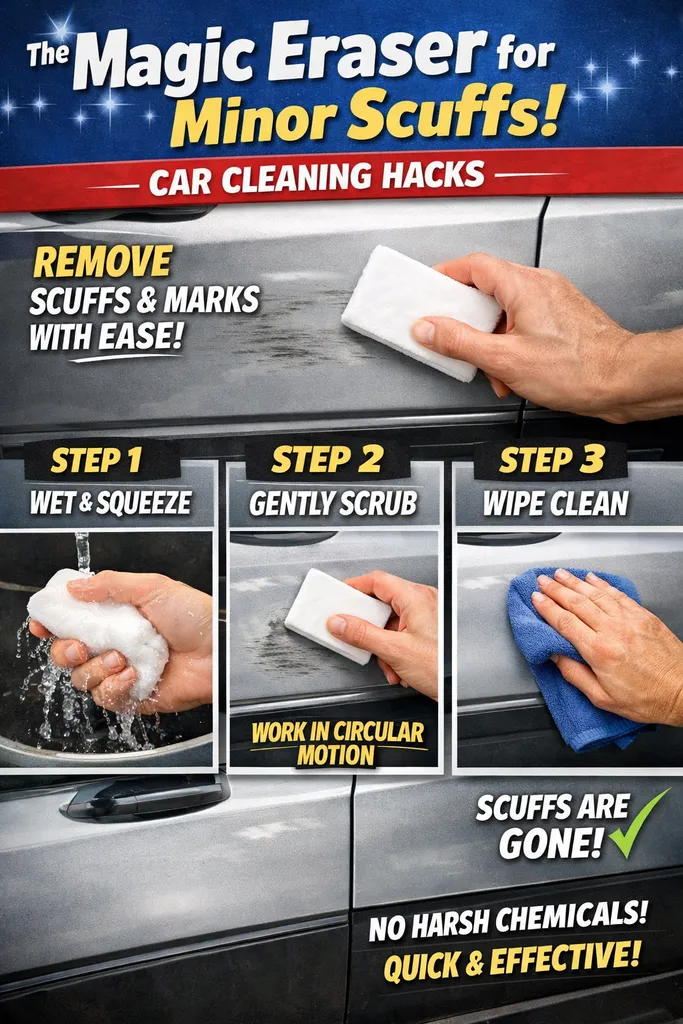
- Price (starts at approximately): $3 for a pack of two.
- How to Hack: Gently use a melamine foam sponge (Magic Eraser) to remove minor scuff marks from painted surfaces .
- What It Is: An ultra-fine abrasive foam that works like extremely fine sandpaper to buff away surface-level marks.
- Why It’s Important: Scuff marks from shoes, shopping carts, or other cars can be unsightly but not deep enough to require professional compounding.
- Benefits: It can quickly erase light scuffs and marks that won’t come off with regular washing, restoring the look of the paint.
- Step-by-Step Instruction:
- Crucial: Wet the Magic Eraser thoroughly and wring it out so it’s damp, not soaking wet .
- Test First: Always test on a small, inconspicuous area to ensure it doesn’t dull the clear coat .
- Gently rub the scuff mark with light pressure. The eraser will dissolve slightly as you work.
- Wipe the area clean with a damp cloth, then dry and apply wax to protect the polished area.
- Best For: Removing light scuff marks and paint transfer from bumpers and doors.
- Popular Brands: Mr. Clean Magic Eraser, generic melamine foam sponges.
Deep Interior Cleaning Method

For heavily used vehicles:
How to Deep Clean Your Car’s Interior: A Step-by-Step Guide
This systematic technique guarantees that you don’t overlook a nook. Allow 2-4 hours to do it properly DIY
Step 1: Preparation and Decluttering
Take: Get rid of everything from the auto. Such as trash, carpet mats, phone chargers, sunglasses, and things in the glove compartment and under the seats.
How: Creates a new blank workspace to make all surfaces available.
Necessary Tools: garbage bag, box/ bag for personal things
Step 2: Thorough Vacuuming
Action: Start applying to top (headliner, pillars) and then down on the floors. Attachments reach every crevice: under seats, in the middle seat cushion, within streaks and door pockets. Vacuum your floor mats separately.
Why: To get rid of loose dust, crumbs and debris prior to having a wet clean so that you do not end up grinding more dirt into the floor when using the vacuum next.
Tools Required: Vacuum cleaner with crevice tool, brush attachment and a upholstery tool
Step 3: Upholstery and Carpet Cleaning
Action (Fabric): Use upholstery cleaner. Super-soft bristle brush agitate stains If you want a more thorough clean, use a steam cleaner or an extractor to pull dirt from the fibres. Use clean towels to absorb any excess moisture.
Action (Leather) — Clean with damp microfiber cloth Use a specific leather cleaner first, and then apply the leather conditioner to maintain flexibility of the material so it does not crack.
Why: This is the essence of deep cleaning, extracting body oils and spills and scent trapped in your fabric or leather.
Correction: Upholstery cleaner/Leather Cleaner (if need), Soft-Bristled Brush, Microfiber towels, Steam Cleaner/Extractor (optional) Clean Leather Car Seats
Step 4: Detailing Hard Surfaces
Step: Clean the dashboard, center console, door panels, and steering wheel with an all-purpose cleaner or interior-safe cleaner with microfiber cloth For painted and shiny surfaces, apply a three-part mixture of water and two parts soap on shiny surfaces such as little edges like door seams and air vents.
Why: These high-contact areas collect fingerprints, dust and dirt. Cleaning them brightens up the inside and lowers how glaring they are.
Tools required: All-purpose cleaner, microfiber towels, soft brushes (toothbrush, detailing brush), cotton swabs.
Step 5: Cleaning the Windows
Action: Do a full glass getter, spritzing the cleaner on a microfiber towel (not directly onto the glass to prevent overspray) and rubbing all internal surfaces of glass. Buff off any streaks with a second dry microfiber cloth. Be sure to roll the windows down a couple of inches to clean the edge at the top.
Why: When it comes to cleanliness, nothing will make your detail look better than clean windows.
Requirements: Glass cleaner, microfiber cloths (at three).
Step 6 — Final Detailing And Odour Removal
Tip: Invest in a protectant for your plastic and vinyl surfaces to help shield them from UV damage. Sprinkle baking soda on carpets and leave for 30 minutes before vacuuming, or place an activated charcoal bag under a seat to neutralise odours. Before replacing the mats and your belongings, make sure everything is dry
Reason: It extends the lifespan of your interior, and deodorises your car cabin.
Necessary Equipment: Plastic/vinyl protectant, baking soda or Activated Charcoal bags, microfiber applicator.
Deep Cleaning at a Glance


Removing Tough Stains from Seats
Stain Removal Quick Reference Guide
Common Car Cleaning Mistakes & How to fix
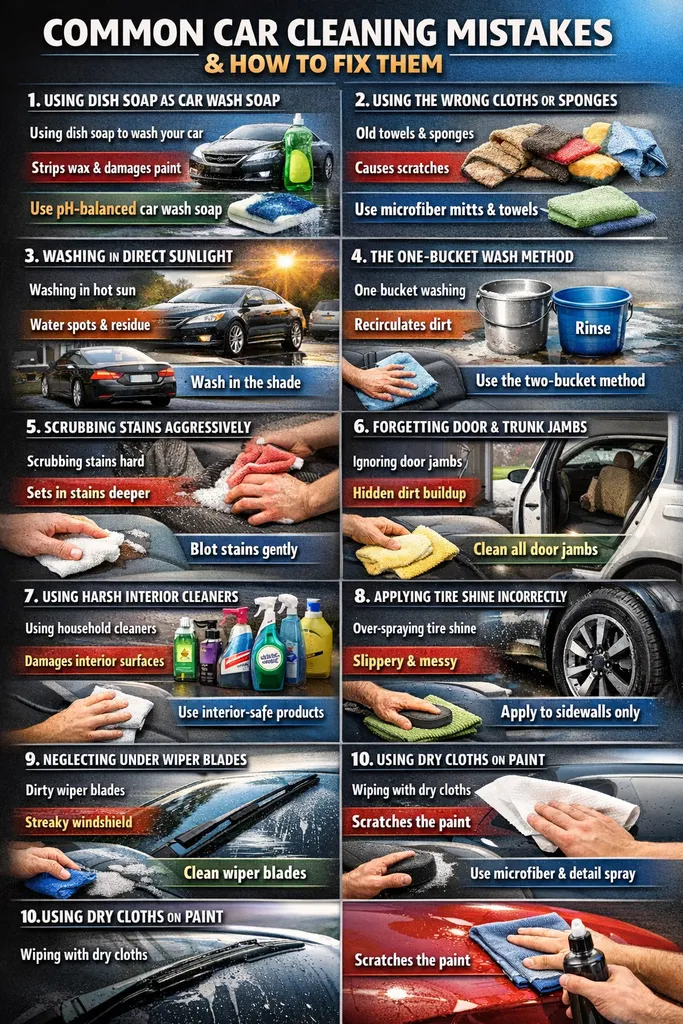
1. Washing Your Car With Dish Soap
The Mistake: Washing your car with a household dish soap (like Dawn), because it is perceived to be cheap and foams nicely.
Why It’s Not So Great: Dish soap is a degrease — it’s designed to get grease and leftover food from your dishes. Also, it’s way too abrasive for automotive paint and will usually strip any protective wax, sealant or ceramic coating exposing the paint to the elements.
The Fix: Use pH-balanced car wash soap formulated to be safe on paint and waxes. It will cleanse properly without removing your protection.
2. Washing in Direct Sunlight
Mistake: Parking your car on hot day in the sun and then washing it.
Why It Sucks: Water and soap evaporate far too quickly. These can cause unsightly water spots (mineral deposits) and soap that is in large enough quantities can be difficult to remove, but also etch into the paint.
The Fix: Wash your car in the cool, preferably shady place on an overcast day. If you are not working in shade, do one panel at a time and rinse while the soap is still wet before it dries out.
3. The One-Bucket Wash Method
The Mistake: Using one bucket of soapy water for the entire wash, reaching back into clean soap after wiping down a dirty panel with a filthy mitt.
What’s Wrong: All you are doing is rinsing dirt and grime back into your wash water, than putting it back on your paint. This is one of the quickest methods to induce swirl marks and scratches.
The Take: Use the two-bucket method. Use a bucket of soapy water and another one with fresh water for rinse. Line it up with the soap-soaked mitt, wash a panel, then rinse the mitt in the plain water bucket to release dirt before refilling it with soap. Grit Guards give you vertical inches of dirt trapper in the bottom of both buckets as well.
4. Scrubbing Stains Aggressively
The Mistake: You notice a particularly tough stain on the inside (a coffee spill or mud) and start rubbing it aggressively with a cloth.
Why It Is Bad: Rubbing too hard can rub the stain deeper into the fabric fibers and it ruins or frays your upholstery. Then the stain will spread, and become bigger and more entrenched.
The Fix: Blot, Don’t Rube. Blot up as much of the liquid as you can with a clean cloth. For set in stains, apply cleaner and dwell time to loosen the stain, gently agitate with a soft brush then blot.
5. Overlooking Door & Trunk Jambs As A Cleaning Point
THE MISTAKE: Scrubbing the outside and drying it, But forgetting all about the coated paint areas within door jams and trunk lid.
Why It’s Bad: It accumulates dirt and grime. This substance is not impacted by that, and when you open the doors it is visible, pulling down what otherwise would be a clean car. This can also cause paint degradation in those places over time.
The Fix: Always open all the doors and the trunk at the end of your wash, wipe down any fingerprints with a damp microfiber cloth and dry them to remove accumulated dirt and water spots.
6. Using Household Cleaners on Interiors
WHAT NOT TO DO: Grabbing Windex, 409 and other multi-purpose household cleaners to clean up the dashboard and door panels.
Why This is Bad: Because these cleaners run so harsh (like ammonia and bleach) that they can be overzealous. They may bleach, dry and fracture vinyl, plastic or leather surfaces. They also ruin the anti-glare coatings of infotainment screens.
THE FIX: Try cleaner designed for automotive interiors. If you are just wiping, then a little water and 1 drop of soap solution is often all that it takes. On screens, use a dedicated electronics-safe screen cleaner.
7. Applying Tire Shine Incorrectly
Mistake: Spraying or applying tire shine products on whole tire including the sidewall that meets the road.
Why It’s Bad: Over applying can slingshot the product right onto your polished paint while driving. In addition, you have reduced tire grip on the tread and this could actually be a safety issue.
The Fix: Use tire shine on just the sidewall Apply a thin, uniform layer with an applicator pad and wipe off any excess product prior to driving.
8. Neglecting to Clean Underwiper Blades
The Error: Cleaning the windscreen however never ever raising the wiper arms to clean the blades themselves.
Why its Bad: The rubber blade gets dirt, oil and grime on it. That stuff gets spread all over your glass when you use your wipers, leading to streaked visibility and needing some replacement glass down the road.
The Fix: Each time you wash your car, raise the wiper arms and wipe down the rubber blade with a cloth soaked in rubbing alcohol or glass cleaner. Is a very simple and easy step, also it gives your longevity to the blades use. It keeps your windscreen clear.
9. Wipe Paint With a Dry Cloth or Paper Towel
The Fix: For light dust removal, spray a little quick detailer in a soft microfiber cloth to lubricate the paint surface and gently lift off the dust. But the one rule is to NEVER wipe a dry car with a dry towel.
THE MISTAKE: Dusting off a dry car with a dry rag or using paper towels and napkins to blot up a spill on the paint.
Why It’s Bad: This is like putting sand paper on your clear coat. Dry dust is an abrasive, paper towels are wood fibers that scratch paint with the tougher scratches. You will definitely produce light scratches and swirl marks.
10. If not using the Right Cloths or Sponges
Mistake 5 : Wipes and dry with old rags, bath towels or sponges from your kitchen sink to wash and dry you the car.
Why it’s Bad: Because they’re coarse, they are always too harsh and can trap dirt and grit. Dragging them across your paint acts like sandpaper, creating thousands of micro scratches (spiderwebbing) in the clear coat.
The Fix: You should probably buy some decent microfiber towels for washing, drying, and polishing. They are fluffy, non scratching, and intended to trap dirt in their fibers as oposed to wiping it across the finish. Do NOT use a sponge, use a microfiber wash mitt.
Pro Tips From Detailers
✔ Use microfiber cloths only
✔ Clean top to bottom
✔ Dry car immediately
✔ Vacuum before wiping surfaces
✔ Use dedicated car products
Car Cleaning Routine (Weekly)
Weekly tasks:
- wipe dashboard
- vacuum floor
- clean windows
- empty trash
Monthly tasks:
- deep seat cleaning
- polish exterior
- tire cleaning
FAQ
1. Where do I wash all of this dusty Air circulation vents?
A soft foam brush or an old toothbrush can help you reach between the vent slats. This helps to pull out dust from tight spots without causing scratches on surfaces.
2. How to remove pet hair sitting in the seat?
To keep a more uniform chunk of fur into one clump, you can lightly mist the fabric with pure water and then use a rubber squeegee to pull the hair together in little balls. That makes it so much easier to remove than just vacuuming.
3. How can I maintain the cleanliness of my cup holders?
Use silicone cupcake liners, wedged between the cup holders. They catch spills and crumbs, and when they need to be washed you just take them out.
4. Question: How to remove odors in the car permanently?
Apply baking soda to carpet and fabric seats, dust for 15–20 minutes and vacuum it away. It helps to neutralize odors rather than just cover them up.
5. How to clean gum from old stickers?
Please use a small amount of WD-40, or direct the hot air from a hairdryer for about 30 seconds in that area. Now, this rubs the glue and makes it soft enough to just peel off.
6. Does toothpaste REALLY mend foggy headlights?
So, yes, mild abrasive-type toothpaste does work to polish away oxidized headlights. Gently rub in a circular motion and rinse it clean.
7. How does the “Two-Bucket Method” apply to washing?
One of the buckets contains soapy water, the other clear water. You rinse your dirty wash mitt in a bucket of clean water first to remove dirt before dipping back into soap, which will reduce scratches.
8. My bumper is full of dead bugs how do I clean them off?
Moisten a dryer sheet and gently rub the area. It breaks down bug residue while being gentle on the paint.
9. Washing your car also follow the same principles?
That is not advised, as dish soap can strip wax and protective coatings from your paint. A dedicated car shampoo is safer.
10.Using common household items to clean and polish my dashboard ?
Yes. Our secret method for restoring shine is a small amount of olive oil or coconut oil on a microfiber cloth. Only use as little as possible to be sure it doesn’t leave with an oily finish.
11. Free Windows: How To Achieve Them
Equal parts water and white vinegar Step 4: Wipe with a lint-free material, like newspaper or coffee filters
12. How to Stop Windows from Fogging Up?
A small amount of shaving cream wiped from the inside glass provides a light anti-fog barrier that may help reduce fogging temporarily.
Final Verdict
Car cleaning hacks can change the way you clean your vehicle entirely. You can achieve great results without spending hours or hiring expensive detailing services — all you need are some simple techniques and household tools.
Many of these tricks, from air vents with toothbrushes to baking soda for smells, make scrubbing a whole lot easier and quicker. DIY car maintenance: The trend of doing it yourself in 2026 (and onwards) As drivers have become all the more aware of how…
Cleaning isn’t just for appearance — it also protects materials in the interior, can prevent long-term stains from forming, and sustains resale value. A clean car will also allow you to transport in a much healthier environment, minimizing dust, allergens and bacteria.
The key is consistency. A quick weekly cleanup paired with a deep clean here and there will help keep your car fresh all year long. The proper tools, soft products and smart techniques ensure a spotless car without damaging surfaces.
Using the hacks and strategies outlined in this guide, you can easily achieve that professional-level clean car from home.
It doesn’t take much for your vehicle to always be fresh, organized and showroom correct.
Leave a Reply