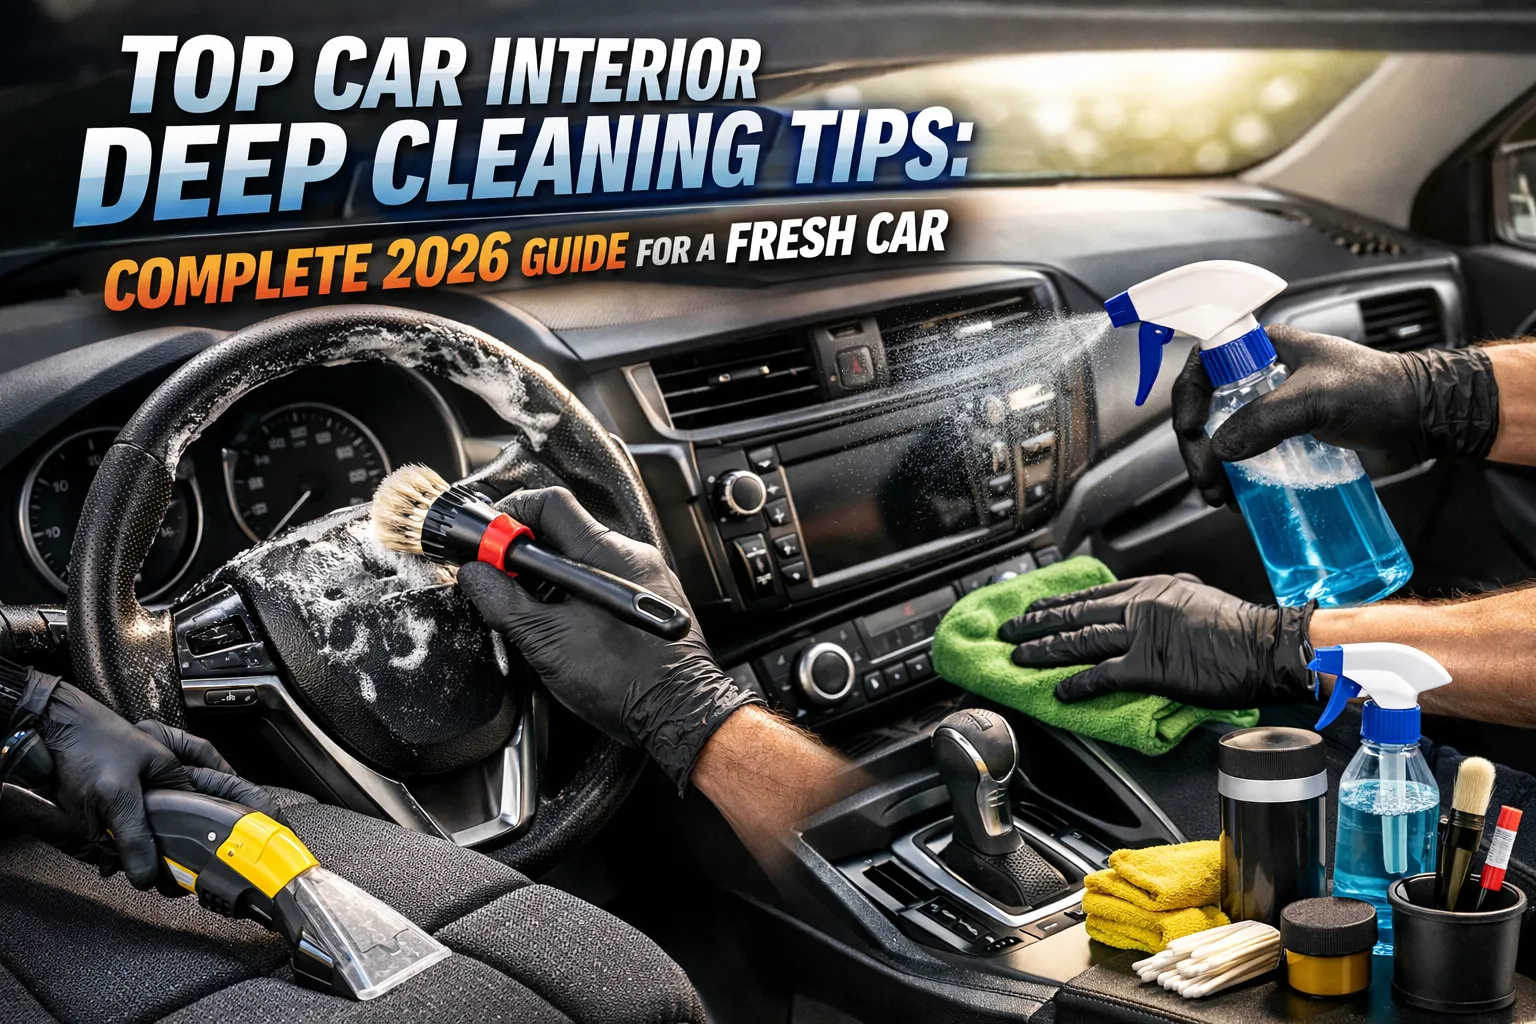
The interior of your vehicle accumulates dust, germs, food crumbs, stains, and bad odors each day. And even if you vacuum from time to time, dirt that escapes notice accumulates in carpet fibers, seat upholstery, air vents and dashboard crevices.
If left alone for an extended period of time, this buildup can lead to odors, stains, allergies and even wear on your car’s interior materials. It’s assumed by many drivers that deep cleaning costs a fortune in the way of professional detailing services. But here’s the truth you can get professional-level results at home when you have the right technique and tools.
Car Interior Deep Cleaning Tips is not merely about aesthetics. It enhances air quality, driving comfort, hygiene and even resale value. A well-detailed interior can help make your car feel like you just took it off the lot.
In this ultimate guide on how to deep clean your car interior, the exact step-by-step tips are revealed for 2026. You will cover every part of the process, from vacuuming carpets and shampooing seats to cleaning vents and removing stubborn stains.
No matter if yours is a daily commuter, family SUV, rideshare vehicle or luxury car, this guide will show you how to get your interior looking as clean and fresh and professional grade or better than that of an expensive detailing shop without spending thousands at one.
In This Complete Guide, You’ll Discover
- Why deep cleaning your car interior is important
- Tools and products professionals use
- Step-by-step car interior cleaning process
- How to remove stains from seats and carpets
- Best ways to eliminate car odors
- Budget vs professional cleaning products
- Common mistakes people make when cleaning cars
- Expert tips to keep your car interior clean longer
Why deep cleaning your car interior is important
Here is a short explanation of why deep cleaning your car interior is important:
- Health & Hygiene: It removes germs, bacteria, and allergens trapped in the fabric, keeping the air you breathe cleaner.
- Preserves Value: It protects the upholstery and surfaces from cracking and wear, which helps maintain the car’s resale value.
- Safety: Clearing dirt from windows, mirrors, and pedals ensures you have maximum visibility and control.
- Comfort & Pride: A clean interior simply makes every drive more pleasant.
Tools and products professionals use
Here is the serialized breakdown of the essential tools and products used by pros to achieve a factory-fresh finish.
1. Dry Vapor Steam Cleaners
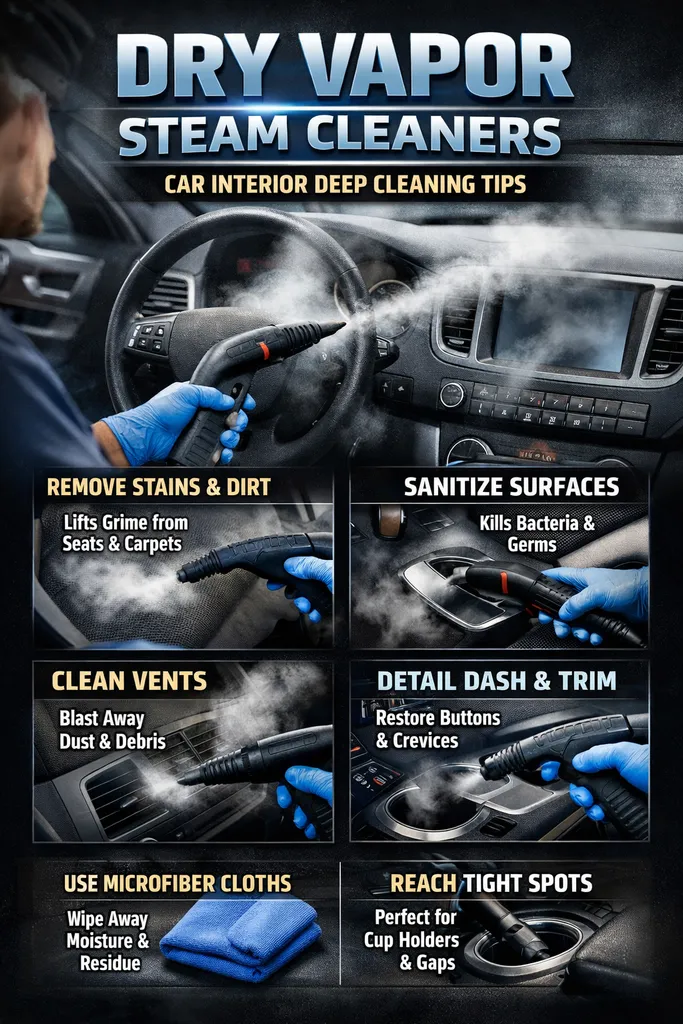
- What is it: A machine that uses high-temperature, low-moisture steam to sanitize surfaces and loosen grime.
- Why It’s Important: It kills 99.9% of bacteria and viruses while breaking down sticky spills without over-saturating fabrics.
- Benefits: Eco-friendly (uses no chemicals), safe for all surfaces, and dries almost instantly.
- Best For: Cup holders, door jambs, air vents, and delicate Alcantara/suede.
- Popular Brands: McCulloch, Fortador, Dupray, Vapamore.
- Price: Starts at approximately $150 (Consumer) / $800+ (Commercial).
2. Professional Carpet Extractors (Hot Water)
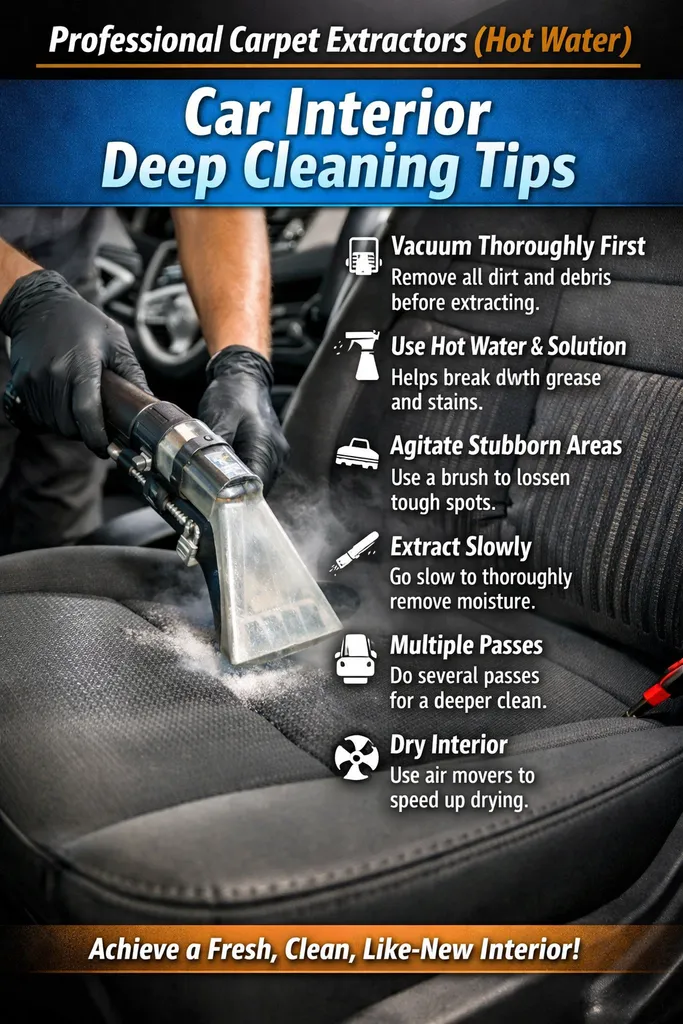
- What is it: A vacuum-based machine that sprays hot cleaning solution into fibers and sucks out the dirt.
- Why It’s Important: Traditional vacuuming only gets surface dust; extractors remove deep-seated stains and odors.
- Benefits: Leaves carpets looking new and smelling neutral by removing the source of the smell.
- Best For: Floor mats, cloth seats, and trunk linings.
- Popular Brands: Bissell (Commercial), Mytee, Sandie.
- Price: Starts at approximately $130 (Portable) / $500+ (Full-size).
3. Tornador Cleaning Gun (Pneumatic)
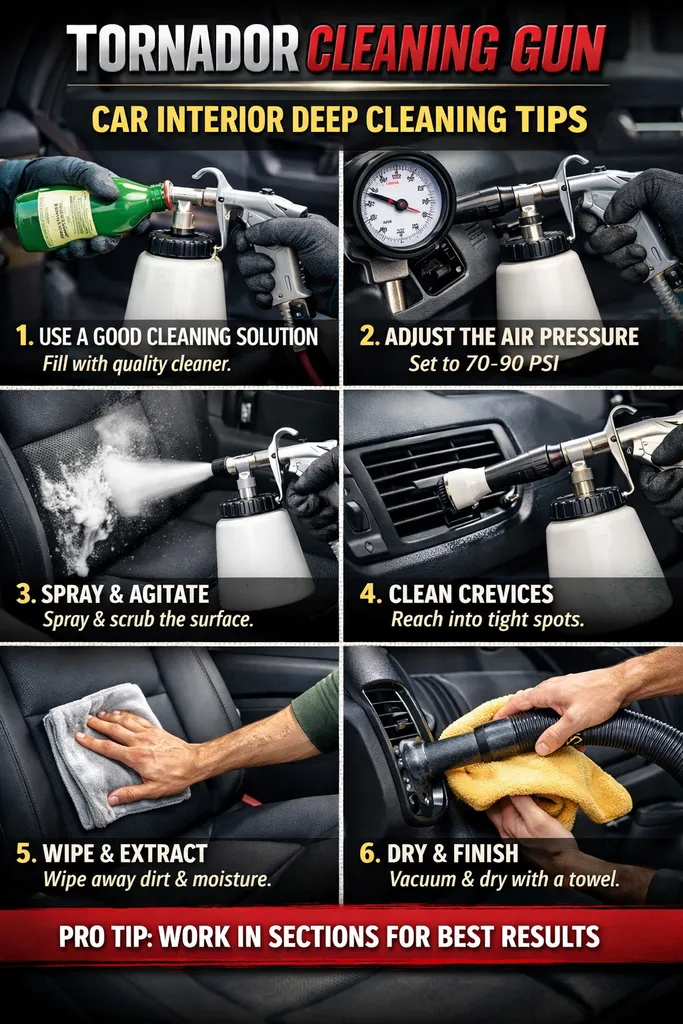
- What is it: A tool powered by an air compressor that creates a “cyclone” effect of air and cleaning solution.
- Why It’s Important: It reaches deep into tight crevices where brushes and towels cannot fit.
- Benefits: Extremely fast cleaning for headliners and textured plastic dashboards.
- Best For: Seat tracks, door pockets, and intricate dash buttons.
- Popular Brands: Tornador, Adam’s Polishes, Chemical Guys.
- Price: Starts at approximately $80 (requires air compressor).
4. pH-Balanced Interior Cleaners (APC)
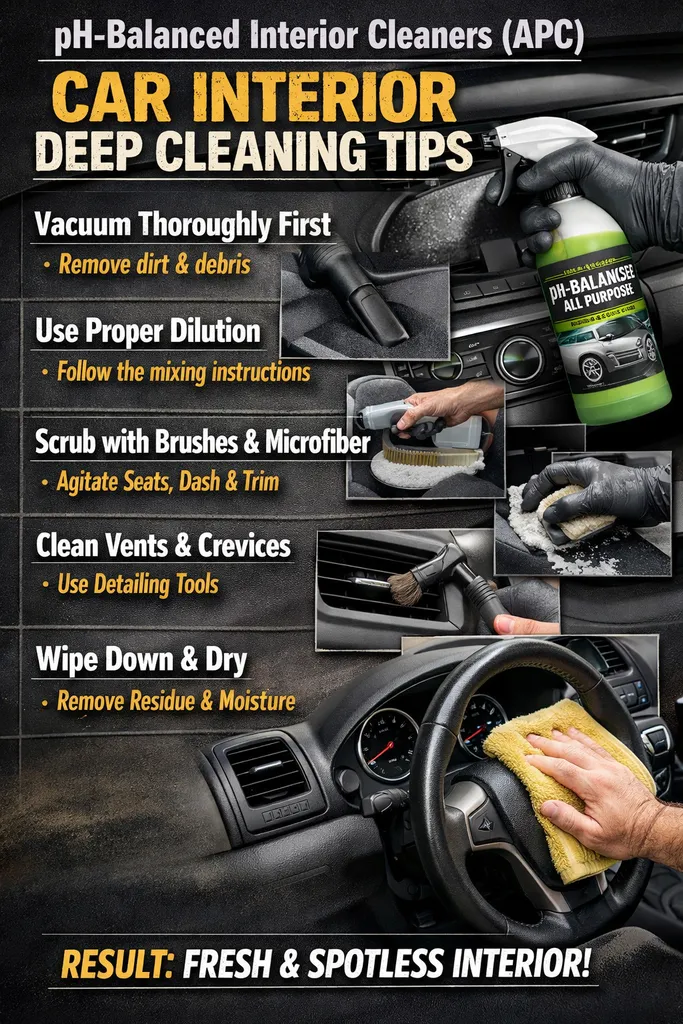
- What is it: A versatile, non-acidic liquid cleaner safe for multiple interior materials.
- Why It’s Important: Using harsh chemicals can bleach plastic or dry out leather over time.
- Benefits: Efficiently cuts through body oils and fingerprints while leaving a natural, matte finish.
- Best For: Dashboards, steering wheels, and door panels.
- Popular Brands: P&S (Xpress Interior), Koch Chemie (Pol Star), Meguiar’s.
- Price: Starts at approximately $12 – $18 per bottle.
5. Boar’s Hair & Synthetic Detailing Brushes
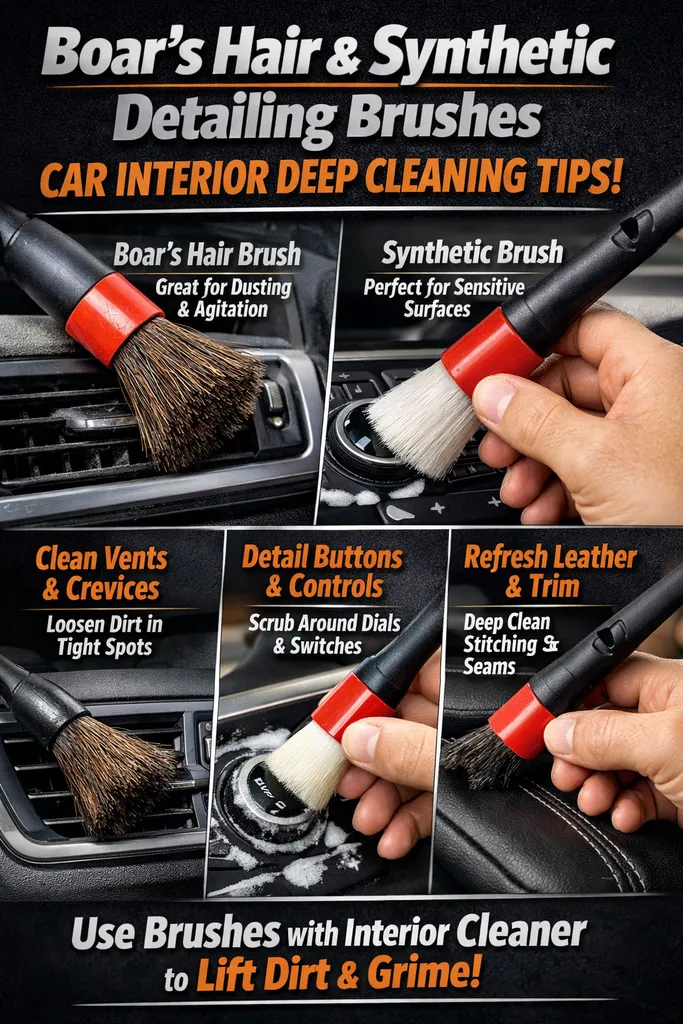
- What is it: Soft-bristled brushes designed for agitation without scratching.
- Why It’s Important: Towels alone can’t reach the “pores” of textured plastics or leather.
- Benefits: Lifts dirt to the surface so it can be wiped away easily.
- Best For: Air vents, leather grain, and speaker grilles.
- Popular Brands: Detail Factory, Work Stuff, Chemical Guys.
- Price: Starts at approximately $10 – $25 for a set.
6. Leather Conditioners & Ceramic Coatings
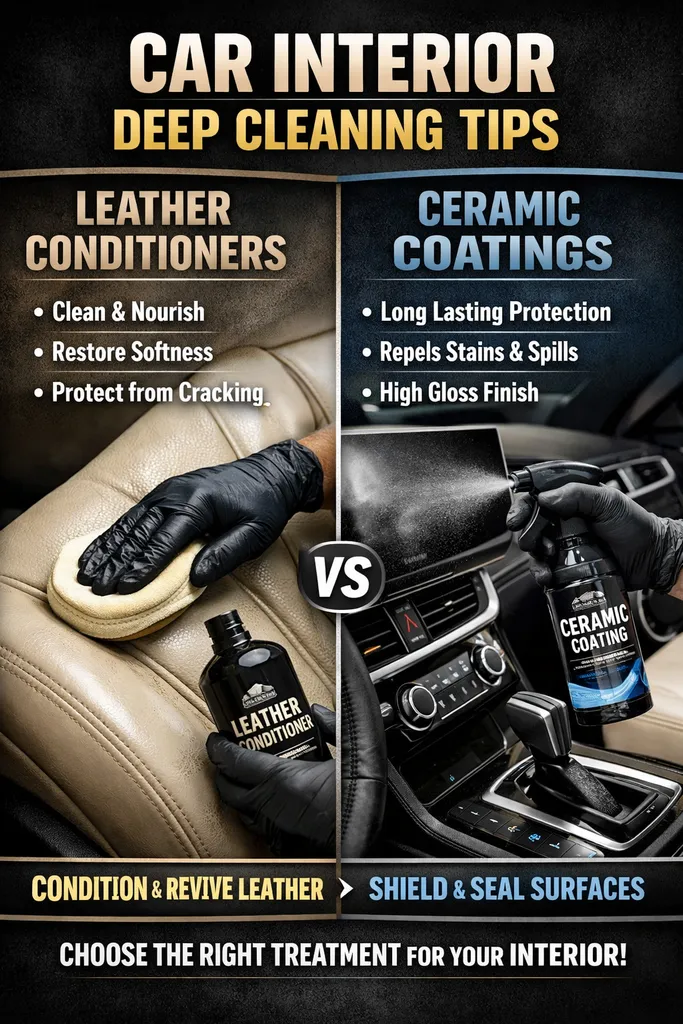
- What is it: A protective layer (cream or liquid) that seals leather surfaces.
- Why It’s Important: Prevents UV damage, cracking, and “dye transfer” from jeans.
- Benefits: Keeps leather soft and makes future cleaning 5x easier.
- Best For: High-end leather seats and armrests.
- Popular Brands: Gtechniq, Colourlock, Leather Honey.
- Price: Starts at approximately $20 – $60.
7. Ozone Generators
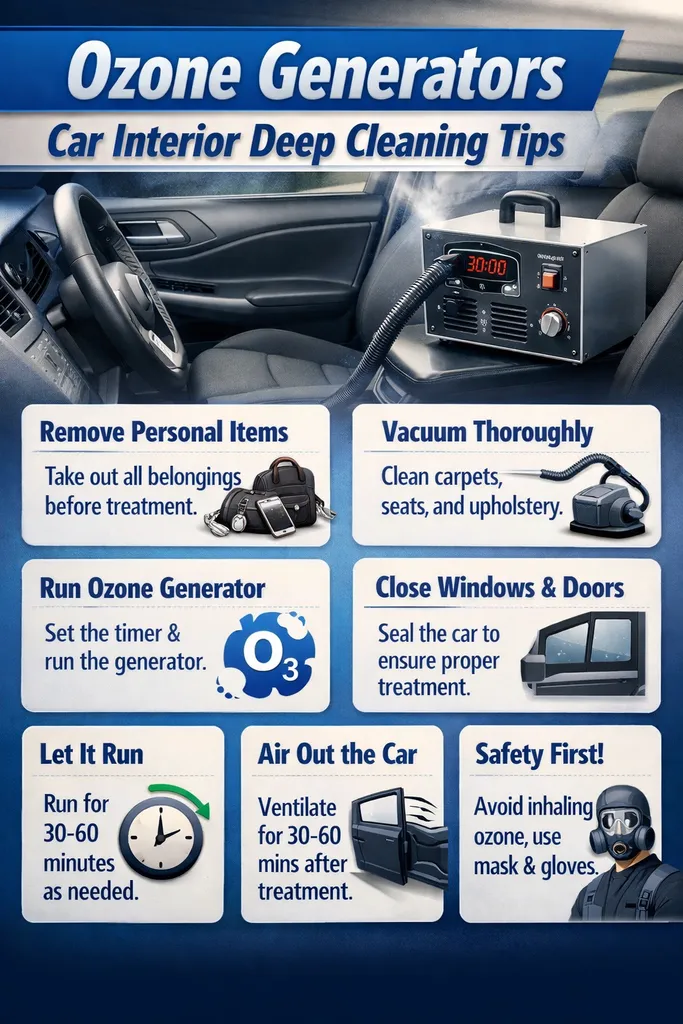
- What is it: A device that produces $O_3$ gas to oxidize and permanently remove odors.
- Why It’s Important: It is the only way to truly kill smoke, mold, or pet odors trapped in the headliner.
- Benefits: Reaches every cubic inch of the car without physical labor.
- Best For: Used cars, smoking vehicles, or mold remediation.
- Popular Brands: Enerzen, Airthereal.
- Price: Starts at approximately $65 – $120.
Step-by-step car interior cleaning process

It is a detailed professional routine to deep clean the interior of a car. TODO: Professionals have a very strict, top-to-bottom, dry-to-wet method when washing to maintain efficiency and avoid re-soiling.
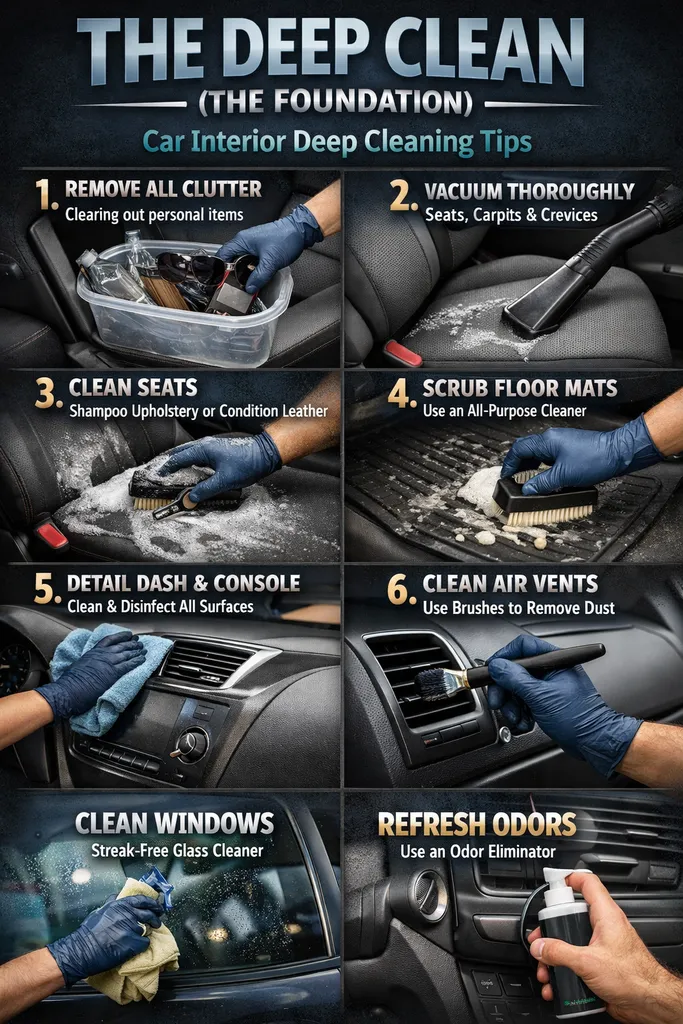
Phase 1 : Preparation & dry-cleaning
Step One: Remove the Junk
Step: Take all your personal things, the floor mats, trash, phone mounts and any temp accessories out of the car.
Why: You want a new, clean slate to be as productive as possible.
Step 2: The “Deep” Dusting
Invite everyone: Use a stiff bristle brush with your either compressed air gun or leaf blower to crucial dust from vents, crevices in the seats and below the pedals.
Why: This makes debris loose enough for the vacuum to suck and not just push it around.
Step 3: Vacuum Pass One
Step: Clean all the crevices (seat rails, cup holders) with a crevice tool. Then go over to a brush attachemnt and clean the head liner, dash and door panels.
Why: The dry allows professional to vacuum the dashboard first. If you do the carpets before the dash, then all that dust falls to your clean carpet, so now you’re doing double duty.
Phase 2 : Agitation & Wet cleaning
Step 4: Inside Brushes (The most important step)
Proposed solution: Spray All-purpose cleaner on carpets and upholstery. Aggressively agitate the fibers with a stiff drill brush or hand brush.
Why: The extractor only extracts what is loosened. The max extracting brush lifts the dirt ingrained within the base of the fibers in your carpet.
Step 5 :Steam Cleaning / extraction
Action: Insert and then extract ONLY the solution with a carpet extractor (or steam cleaner). Remove immediately by vacuuming it. Make long, slow strokes over the area until you have removed everything as best as you can get.
Why: This washes away the soap and particly matter suspended up in it, which can cause “detergent build-up,” which is counterproductive since once it’s built up, it attracts dirt.
Step 6: Leather & Vinyl Care
Step 7: Take a damp microfiber towel or honey extract walnut leather cleaner and wipe down all vinyl, plastic, and leather surfaces. For leather, apply a specialized leather conditioner next.
Why: Leather is porous, and if you do not condition it after cleaning then it can dry out & crack.
Phase 3: Glass & Finishing
Step 7: Glass Cleaning (Inside)
Action: Apply glass cleaner to your microfiber rag (never spray directly on the glass or you could overspray and mess up the dash). Vertical on the driver and short side on the passenger.
The reason: The cross-hatch pattern assists you track down and conquer streaks more efficiently.
Step 8: Last Vacuum & Detailing
Task: Final vacuum of the carpets/trunk. Then, with a tiny detailing brush, make sure switchgear and vent slats are cleaned to perfection. Last, place the clean floor mats back into the car.
THE “PRO” FINISHING TOUCH — Phase 4
Step 9: Air Freshening
If using ozone generator or chemical fogger, ACTION: This will be done last with the car running and the AC set to recirculate. The smell will pull into the vent.
Why: This removes the odours trapped deep in the HVAC system, where sprays and wipes cannot penetrate.
How to remove stains from seats and carpets
The determination of whether or not it will be effective to soak the stains on car seats and carpets, depends largely on the technique used, because spills are typically of different types. The one golden rule that all professionals and experts can agree on — blot, never rub — because rubbing will scratch the stain deeper into the fibers . Below is a guide to removing the most common kinds of stains, with approaches that use everything from stuff you might have around the house to dedicated commercial products.
Stain Removal Guide by Type

Grease & Oil
Recommended Cleaners & Agents: Baking soda, cornstarch, dish soap, dedicated degreaser.
Step-by-Step Method:
Absorb: Immediately sprinkle with baking soda or cornstarch to absorb the oil. Allow it to remain for few hours or overnight.
Hoover: Vacuum up the powder.
Cleaning: Mix a small amount of gentle dish soap with warm water. Soak a microfiber cloth in the dilution and dab the stain lightly. Wipe: Blotting cloth with only plain water.
Food & Drink (Coffee, Soda, Juice)
Recommended Cleaners & Agents : Mild soap, White vinegar, Water, Commercial upholstery cleaner [Hercules Mirror Cleaner].
Step-by-Step Method:
Dab Up Fresh Spills: If the spill is fresh, immediately dab up as much liquid as possible with a clean and dry cloth.
Apply Solution: Combine warm water with a few drops of dish soap, or equal parts white vinegar and water.
Blot & Lift: Place the solution on the stain with a cloth and blot lightly. For set-in stains, allow to sit for 1015 minutes before blotting.
Mud & Dirt
Recommended Cleaners & Agents Vacuum,mild dish soap,water,soft brush.
Step-by-Step Method:
Dry Fully: This is the most critical step of all, you want your mud to dry completely. Trying to clean soft muck will only smear it around.
Hoover and Brush – When dry, hoovering the dirt particles (and achieving maximum results), along with soft brushing to detach any other residue on the fibers that may remain from cleaning.
Spot Clean: For any remaining mark, clean with a mild soap and water solution.
Pet Accidents (Urine, Vomit)
Suggested Cleaners & Agents: White vinegar, baking soda, enzyme cleaner.
Step-by-Step Method:
Blot Solids/Liquids: With a cloth or paper towels, absorb as much of the mess you can.
Deodorization: Spraying the area with a solution of 50/50 white vinegar and water will help to neutralize odors and bacteria.
Deodorize: After the vinegar solution has dried up, sprinkle in baking soda liberally over the area to help absorb any odor left. Leave it to work for a couple of hours, or overnight, then vacuum clean very well. Enzymatic cleaner is best for biological stains.
Ink & Marker
Suggested Cleaners & Agents rubbing alcohol, hairspray.
Step-by-Step Method:
Step 2: Wipe solvent with a rag (soaking in a little rubbing alcohol) Do not just pour it directly on to the stain.
Dab Blot: Gently dab the stain. The ink should be beginning to transfer onto the cloth. Keep dabbing with a fresh part of the fabric until no more ink comes up. It works the same way that hairspray does.
Read below for some of the best tips on how to erase car odors
Even a simple commute suddenly feels like climbing a hill when there is an irritating smell plaguing your car. From the ” lingering” fast food to wet floor mats ad holder scientific experiments from your backseat, you’ve got to stop covering stink with perfume and actually get rid of it.
Here is the best game plan to get your vehicle belonging smelling like a car again.
1. The Deep Clean (The Foundation)
You can’t spray your way out of a physical source of odor.
- The “Cracks and Crevices” Hunt: Check under seats and inside seat pockets for old food, gym clothes, or damp trash.
- Vacuum Everything: Use a high-powered vacuum (or a shop vac at a car wash) on the carpets, seats, and the rear parcel shelf. Odors often live in the dust trapped in the fibers.
- Steam Clean: If the smell is deeply embedded in fabric seats, a portable steam cleaner can lift the oils and bacteria that sprays won’t reach.
2. Natural Odor Absorbers
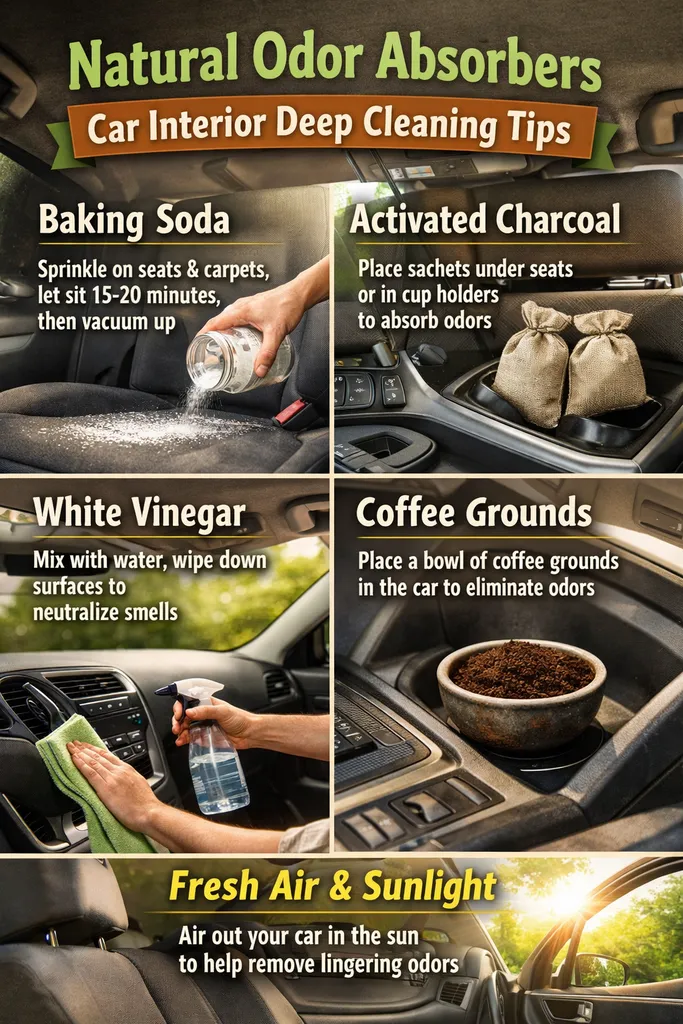
If the “source” is gone but the “ghost” of the smell remains, these household hacks are surprisingly powerful:
- White Vinegar: Place a bowl of white vinegar on the floor mat overnight (while parked!). It’s excellent at pulling smells out of the air. Just remember to remove it before you drive.
- Baking Soda: Sprinkle it liberally on the carpets and seats, let it sit for at least two hours (or overnight), then vacuum it up. It’s a classic for a reason.
- Coffee Grounds: Dry, unused coffee grounds in a mesh bag act as a natural deodorizer and leave a pleasant, subtle scent.
3. Tackle the Ventilation System
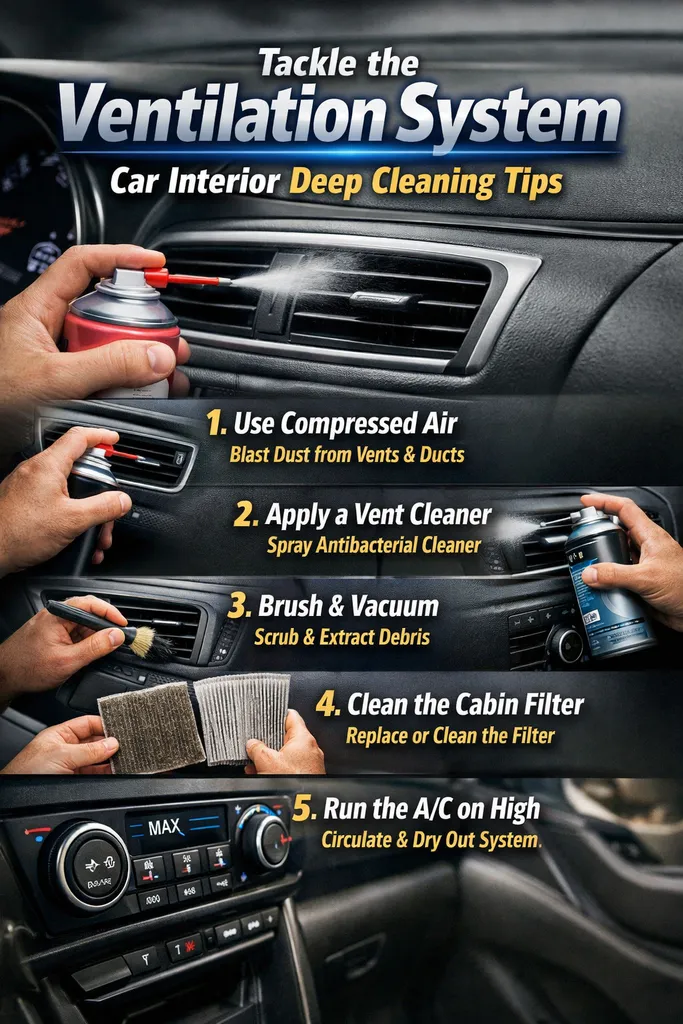
Sometimes the smell isn’t in the cabin—it’s in the vents.
- Change the Cabin Air Filter: Most people forget this exists. If it’s clogged with dust and pollen, your AC will blow “musty” air every time you turn it on.
- The Intake Spray: Turn your AC on full blast (recirculate OFF) and spray a specialized disinfectant or an odor neutralizer into the exterior air intake vents (usually near the base of the windshield).
4. Advanced “Nuclear” Options
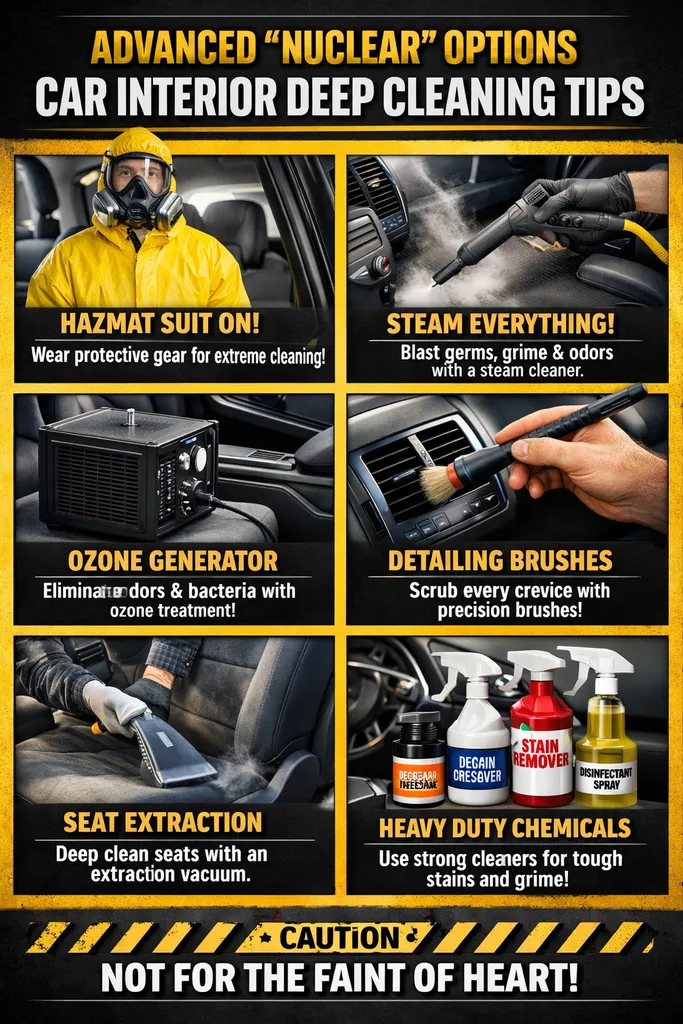
If you’re dealing with cigarette smoke or mold, standard cleaners might fail.
- Ozone Generator: This is the professional’s secret weapon. It creates $O_3$ (ozone) which oxidizes odors at a molecular level. Warning: You cannot be in the car while this is running, and you must air it out thoroughly afterward.
- Enzyme Cleaners: Best for “organic” accidents (pet messes or spilled milk). These literally eat the proteins that cause the smell.
Quick Comparison Table
| Method | Best For | Effort Level |
| Baking Soda | Spills & General Funk | Low |
| Vinegar Bowl | Smoke & Strong Odors | Low |
| Air Filter Swap | Musty AC Smells | Medium |
| Steam Cleaning | Deep-set Fabric Smells | High |
Common mistakes people make when cleaning cars & How to Fix it
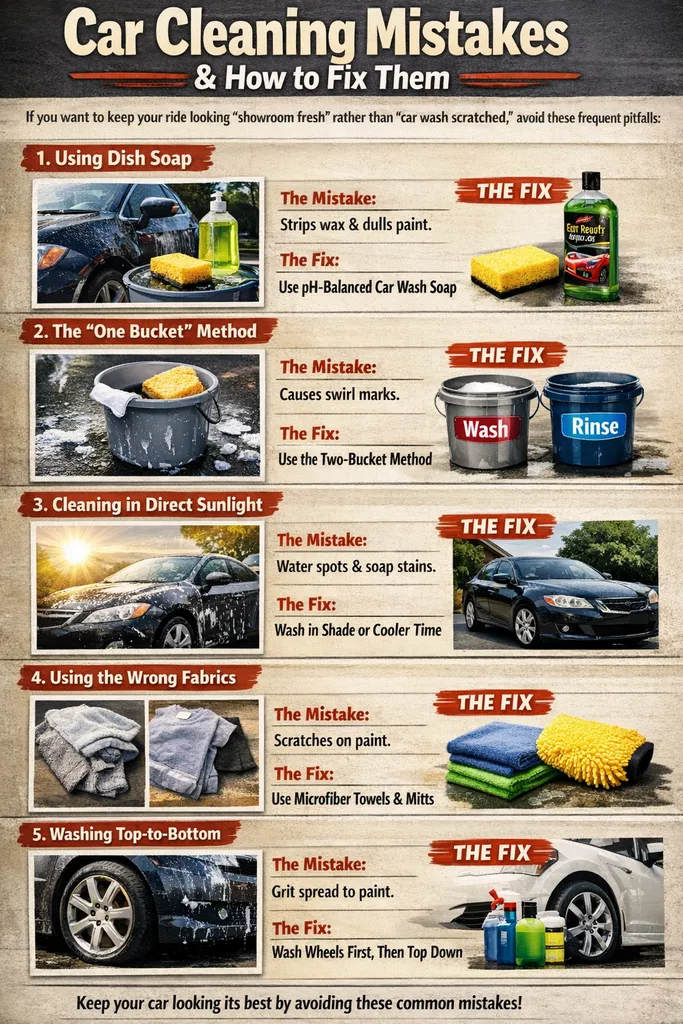
To keep your beauty looking “showroom fresh avoid the most common pitfalls:
1. Using Dish Soap
A dish soap is meant to attack grease and food removed from ceramic; on a car, it removes protective wax off paint and clear coat.
- The Result: Your paint becomes dull, unprotected, and more susceptible to UV damage and rust.
- The Fix: Use a dedicated automotive car wash soap that is pH-balanced.
2. The “One Bucket” Method
Which is why, of course, you should clean your sponge at least once a week or more often if it’s especially greasy — because if you stick your dirty sponge back in the same soapy water with which you started, all that does is spread grit around. The dirt is basically sandpaper, which causes those little swirl marks you see in the sunlight.
- The Fix: Use the Two-Bucket Method. Fill one bucket with soapy water and another with plain water to rinse your mitt after every pass.
3. Cleaning in Direct Sunlight
Washing a hot car under the sun causes water and soap to evaporate almost instantly.
- The Result: You’ll be left with stubborn water spots and soap streaks that are harder to remove than the original dirt.
- The Fix: Wash your car in the shade or during the cooler parts of the day (early morning or evening).
4. Using the Wrong Fabrics
That old bath towel or cotton t-shirt is too abrasive for modern clear coats. They tend to trap dirt on the surface rather than pulling it away.
- The Fix: Use Microfiber towels and wash mitts. They are designed to lift and trap particles within the fibers, keeping them away from the paint.
5. Washing Top-to-Bottom vs. Bottom-to-Top
Oooh, wait—people scrub the nastiest bits first. Road grime from every wheel well and low rocker panel down is wicked harsh. If you wash those first, then use the same mitt on your hood, you are dragging heavy grit across prime real estate.
- The Fix: Always wash your wheels and tires first with a separate set of tools, then move to the body of the car, working from the roof down.
Common Interior Blunders
| Mistake | Why it’s Bad | The Better Way |
| Silicone-based Shine | Makes dashboards “greasy” and creates a distracting glare. | Use a matte-finish interior detailer with UV protectant. |
| Spraying Directly on Tech | Liquid can seep behind screens and buttons, causing shorts. | Spray your cloth first, then wipe the screen. |
| Ignoring the Seatbelts | Dirt and oils can degrade the webbing over time. | Pull them out and wipe with a mild soap/water mix. |


FAQ
1. What is the recommended cleaning order?
Always clean from top to bottom; From headliner and dashboard, to seats & center console, to carpets and floor mats: plan your details so that dust cannot drop on areas you have already cleaned.
2. Can I use household cleaners?
No, it’s not recommended. Bleach or ammonia is also a bad idea as some harsh chemicals may eat away at plastic and leather. One should stick to car-care products made specifically for the job from brands such as Chemical Guys or Auto Finesse, which are much safer.
3. How do I deep clean fabric seats without an extractor?
Vacuum to Shovel Out The Loose Dirt. But the good news is that upholstery cleaner can loosen it up — and a soft brush takes care of business. Then blot with a microfiber towel – do not soak because, if moisture remains trapped then mold or mildew can occur.
4. What is the “matte finish” rule for leather?
When leather is clean it should look matte, not shiny. The shine usually comes from dirt and oil. Clean with a cleaner that is pH balanced followed by conditioning which keeps the leather supple and prevent cracks.
5. How can I remove stubborn odors like smoke?
Just apply bicarb soda onto the carpets and seat — then leave overnight and hoover thoroughly. In cases of heavy odors, experts may utilize ozone therapy to destroy the bacteria meaning causing odor in a surfaces and to prevent future ones.
6. How do I clean electronics and screens safely?
Do not spray cleaner directly on the screens. Use a dry microfiber cloth or mist screen-safe cleaner onto the cloth first before gently wiping to prevent scratches.
7. What’s the best way to handle pet hair?
Use a rubber brush, lint roller, or pumice stone to gather hair into clumps. Then vacuum it up—this works much better than vacuuming alone.
8. How do I clean hard-to-reach air vents?
Use a soft detailing brush, compressed air, or foam swabs to loosen dust. Follow up with a vacuum to remove debris from deep inside the vents.
9. Why should I clean my seat belts?
Over time, seat belts will accumulate sweat and oils. Fully pull them out, wash with a mild fabric cleaner, scrub gently, dry completely, extend back into their place.
10. How do I prevent streaks on windows?
Utilize two separate microfiber towels; one to clean and one to dry up. Use a non-ammonia cleaner and wipe overlapping or zig-zag motions to get a streak-free finish.
11. What are “high-traffic” areas I should disinfect?
Steering wheel, gear shift, door handles and seatbelt buckles. These spots are germ traps and need frequent cleaning.
12. How often should I perform a deep clean?
You can do basic cleaning on a monthly (or even weekly) basis, but you should have a proper deep clean once every 4–6 months to keep everything clean and minimise the loss of value in your vehicle.
Final Verdict
While deep cleaning your car interior is one of the best ways to keep your vehicle comfortable, hygienic and protect long-term value. You can get rid of surface dirt with regular vacuuming, but if you really want to give your vehicle a top-to-bottom clean, only an interior deep clean will reach the embedded grime and stubborn stains, bacteria and odors.
The great news is you don’t require pricey skilled services to reach splendid results. If you heed the right tips & tricks, cleaners and step-by-step process, it’s possible to bring your vehicle’s interior back to showroom-fresh condition in a low-cost manner at home.
From the act of vacuuming carpets and scrub ladders to cleaning fewer chairs, detailing air vents, and conditioning leather — each stage combines to ensure that you have a far healthier goings for both comfort. Keeping the interior clean is also protective of your car’s materials, helping to stave off cracked leather, sun-bleached plastics and entrenched stains.
So ideally, deep clean your car interior every 2–3 months and perform light maintenance cleaning in-between.
A bit of regularly tending and the how-tos highlighted in this guide could keep your car clean, fresh and pleasant all year round.
Leave a Reply