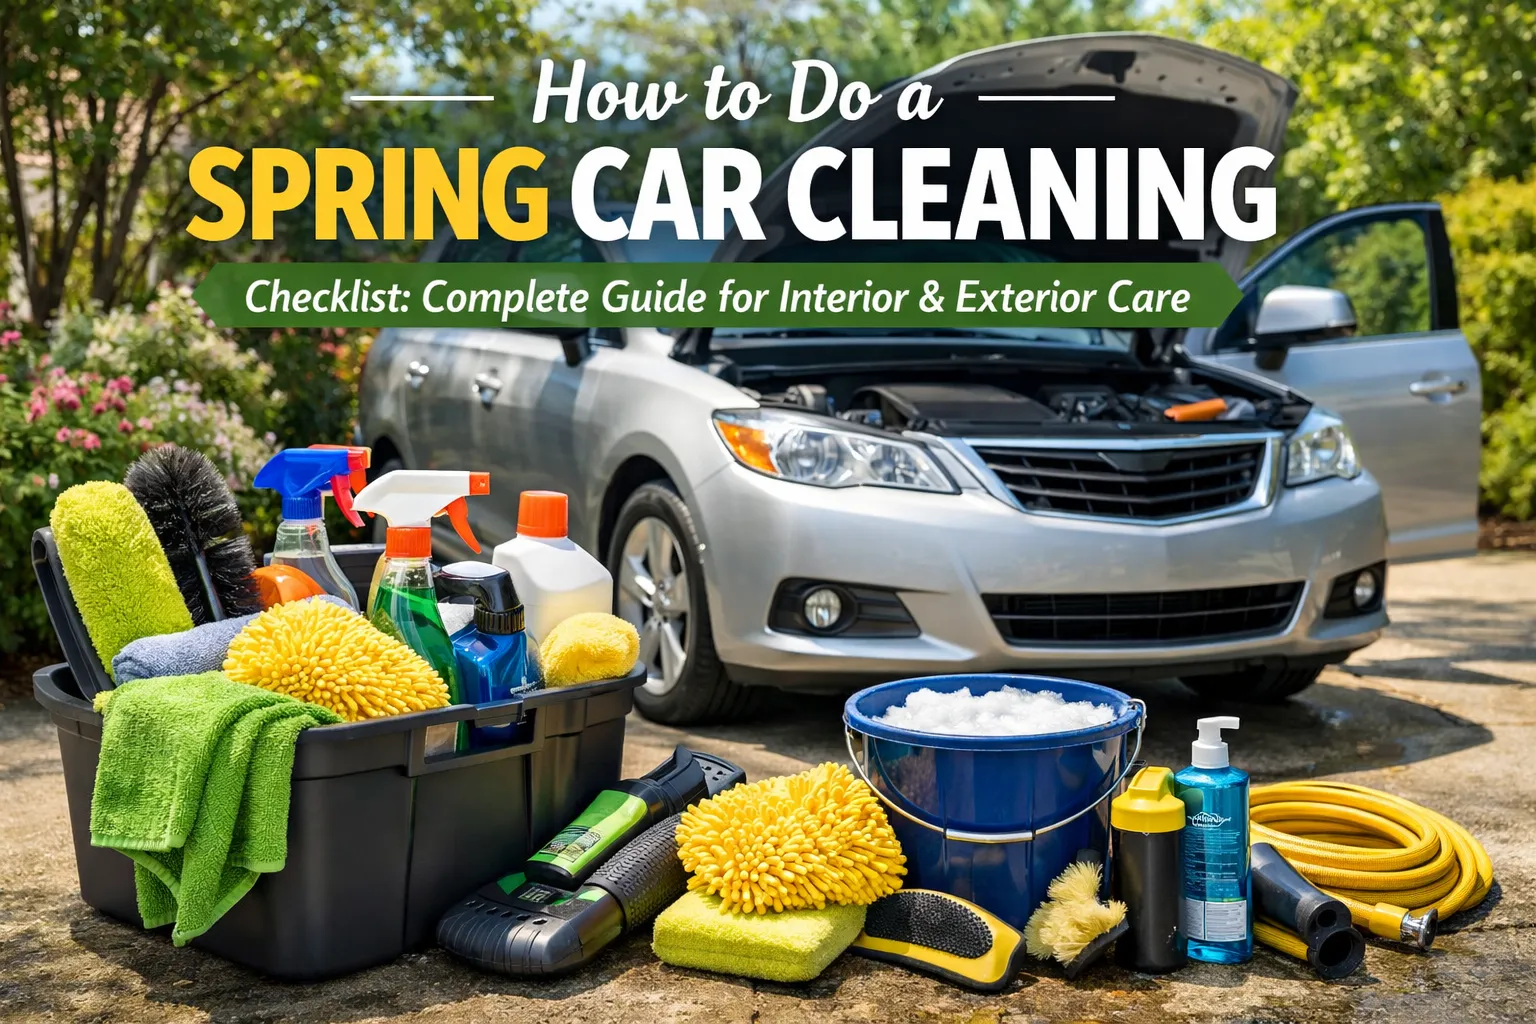
After a long winter of snow, road salt, mud and desert dust, your car deserves more than a basic wash. Dirt collects in places that you don’t notice frequently underneath seats, inside air vents, around wheel wells and under floor mats. If ignored, these contaminants can corrode paint and produce foul odors, even causing permanent damage inside your car.
That’s why all car owners must get a spring car cleaning checklist.
A full refresh for your vehicle and removing winter grime along with prepping for warmer driving conditions are just a few of the things you can do this spring. Having a proper cleaning routine does not only improve the appearance of your car but also protects the paint, preserves interior materials, and can maintain resale value.
The good news is you don’t need professional detailing know-how or fancy equipment to accomplish it. With the right tools, easy techniques and a structured checklist, you can end up with professional-quality results at home.
This guide covers the thorough spring car cleaning checklist for 2026, including interior cleaning, exterior detailing, tools to get and common mistakes. When you’re done, your car will look, smell and feel like new.
In This Complete Guide, You’ll Discover
- Why spring is the best time for a deep car clean
- The ultimate spring car cleaning checklist
- Interior cleaning steps for a fresh cabin
- Exterior detailing techniques for a showroom shine
- Essential tools and accessories every car owner needs
- Time-saving cleaning hacks professionals use
- Common mistakes that can damage your car
- Pro tips to keep your vehicle cleaner longer
The Complete Spring Car Cleaning Checklist
Why Spring Car Cleaning Matters
Winter can be brutal for vehicles. Salt, sand, and grime accumulate on both the interior and exterior surfaces. Without proper cleaning, these elements can cause:
- Paint corrosion
- Interior stains
- Unpleasant odors
- Rust formation
- Reduced resale value
A spring cleaning routine restores your vehicle’s condition and protects it from long-term damage.
Essential Tools for Spring Car Cleaning
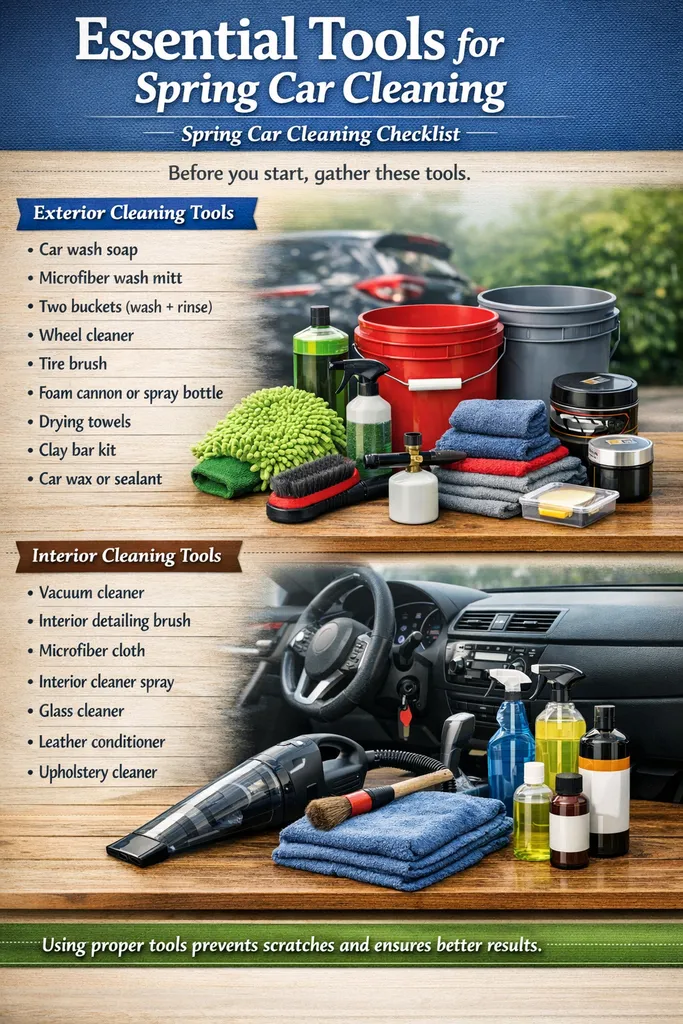
Before you start, gather these tools.
Exterior Cleaning Tools
- Car wash soap
- Microfiber wash mitt
- Two buckets (wash + rinse)
- Wheel cleaner
- Tire brush
- Foam cannon or spray bottle
- Drying towels
- Clay bar kit
- Car wax or sealant
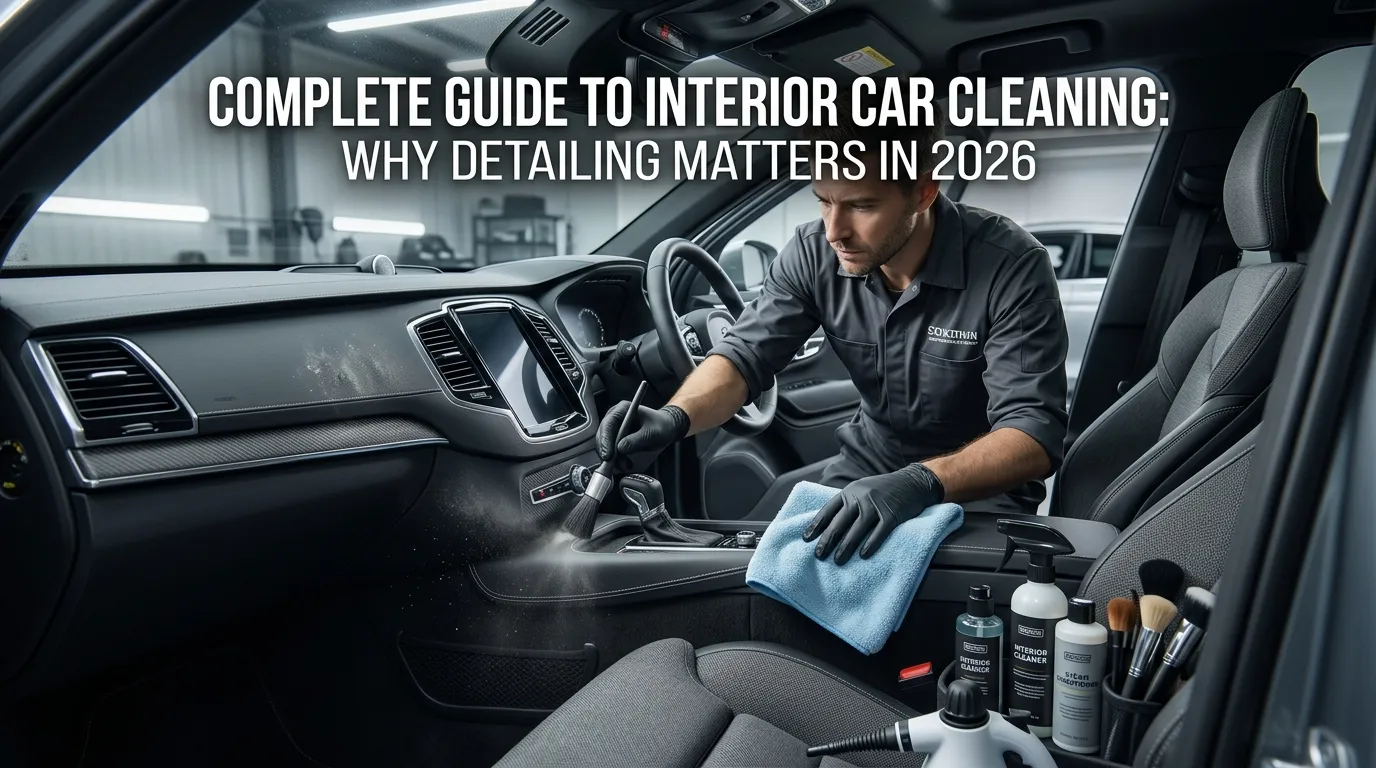
Interior Cleaning Tools
- Vacuum cleaner
- Interior detailing brush
- Microfiber cloth
- Interior cleaner spray
- Glass cleaner
- Leather conditioner
- Upholstery cleaner
Using proper tools prevents scratches and ensures better results.
Spring Car Cleaning Checklist (Step by Step)
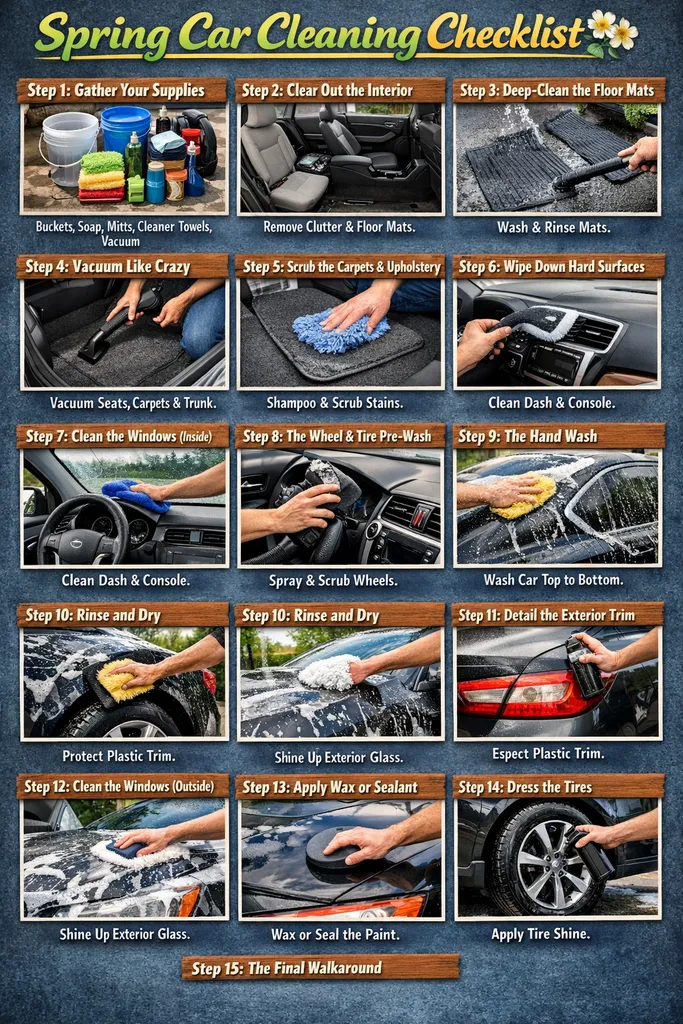
This is basically a serial and super simple Spring Car Cleaning Checklist from day 1 to day n.
Step 1: Gather Your Supplies
A pair of buckets (one for soap, one for rinse), car wash soap, microfiber mitts or washing pads, wheel cleaner and tire shine; oglass cleaner and any other accessories like a vacuum from the interior wipes by.
Step 2: Clean Out The Inside
Vacuum and take out the trash, floor mats, gym bags—basically everything that you can take out of the cabin. Remove everything to show every square inch.
Step 3: Deep Clean the Floor Mats
Remove rubber or carpet mats. Give them a hose down, scrub with soapy water. While taking care of the rest of the car hang them to dry.
Step 4: Vacuum Like Crazy
Get between seats and center console with a crevice tool. Vacuum all carpets, seats, and trunk to remove winter sand, salt and crumbs.
Step 5: Carpet and Upholstery Cleaning
Upholstery cleaner – For fabrics and carpets, that also need specialist products to treat stains. Soft brush to agitate followed by blotting until dry.
Step 4: Clean hard surfaces
Your dashboard, door panels, center console and steering wheel can all be cleaned with an all-purpose cleaner or interior wipes. This is possible to use a soft brush for getting the dust out of air vents.
Step 7: Windows (Inside)
Put some glass cleaner on a microfiber cloth (not the glass itself) and wipe all of that glorious interior as well. Turn over the cloth and polish until clear to remove winter haze.
Step 8: Pre-Wash of Wheels & Tires
The exterior can be started with spraying the wheels and tires of your vehicle using a wheel cleaner. Use a brush to agitate, rinse off any loose brake dust.
Step 9: The Hand Wash
Get one bucket with soapy water and another bucket with plain water. With the microfiber mitt, wash the car from top to bottom, and rinse your mitt often in a plain water bucket to help prevent any scratches in your paint.
Step 10: Rinse and Dry
Remove all soap with a hose. Use a microfiber drying towel or chamois to dry the car right away, avoid leaving water spots.
Step 11: The exterior trim
Treat any black plastic trim, bumpers or weather stripping that appears faded from the winter sun and salt to a topical protectant or restorer.
Step 12:Cleaning Windows (Outside)
Use automotive glass cleaner to clean all outside of the car glasses. Be sure to pick up side mirrors and rear window so you can see best in the spring.
Step 13: Apply Wax or Sealant
PROTECT THE PAINT: Either a wax or paint sealant will do the trick to keep your paint protected from spring pollen, rain and UV rays.
Step 14: Dress the Tires
Finish off your work with some tire shine on the sidewalls.
Step 15: The Final Walkaround
Inspect and refill of windshield washer fluid Make sure all lights are clean and operational. Enjoy the fact that you did it.
Optional Deep Cleaning Tasks
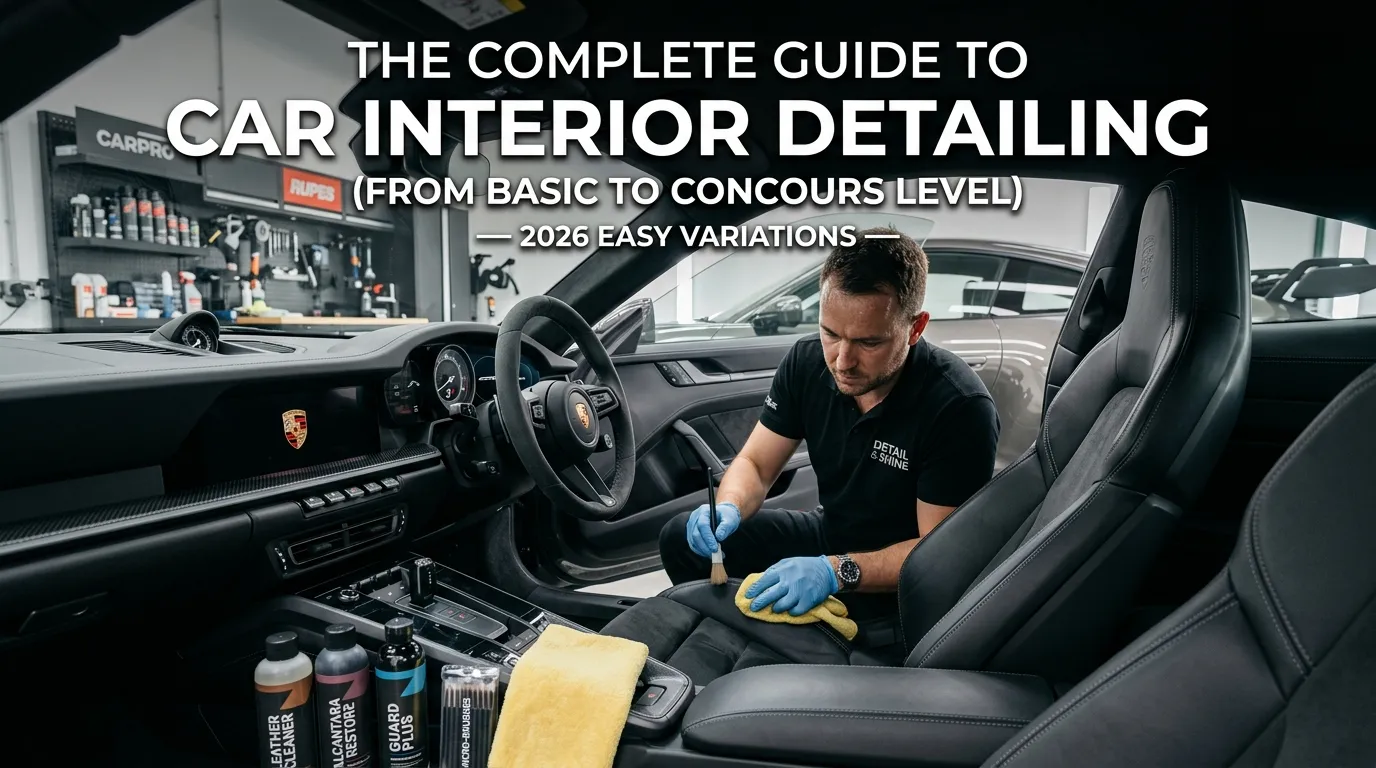
Interior Deep Cleaning
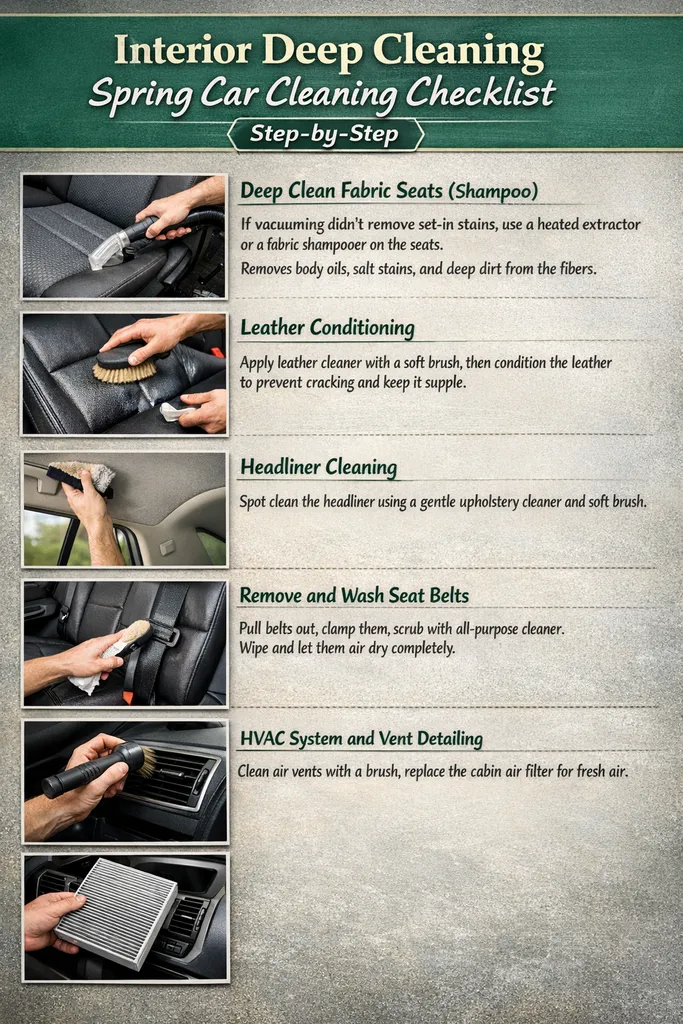
Deep Clean Fabric Seats (Shampoo)
- If vacuuming didn’t remove set-in stains, use a heated extractor or a fabric shampooer on the seats. This removes body oils, salt stains, and deep dirt from the fibers, restoring the original color and texture.
Leather Conditioning
- Go beyond simply wiping leather. Apply a dedicated leather cleaner with a soft brush to get grime out of the grain, then apply a leather conditioner or balm to prevent cracking caused by winter dryness.
Headliner Cleaning
- Carefully spot-clean the headliner (ceiling fabric) using a gentle upholstery cleaner and a very soft brush. This area collects dust and occasional smudges but is easily damaged by excessive moisture or scrubbing.
Remove and Wash Seat Belts
- Pull the seat belts all the way out, clamp them so they don’t retract, and gently scrub the webbing with a diluted all-purpose cleaner. Rinse with a damp cloth and let them air dry completely before retracting.
HVAC System and Vent Detailing
- Use a soft detailing brush or a foaming vent cleaner to reach deep into the air vents. Replace the cabin air filter to ensure spring pollen doesn’t blow into your face.
Exterior Deep Cleaning
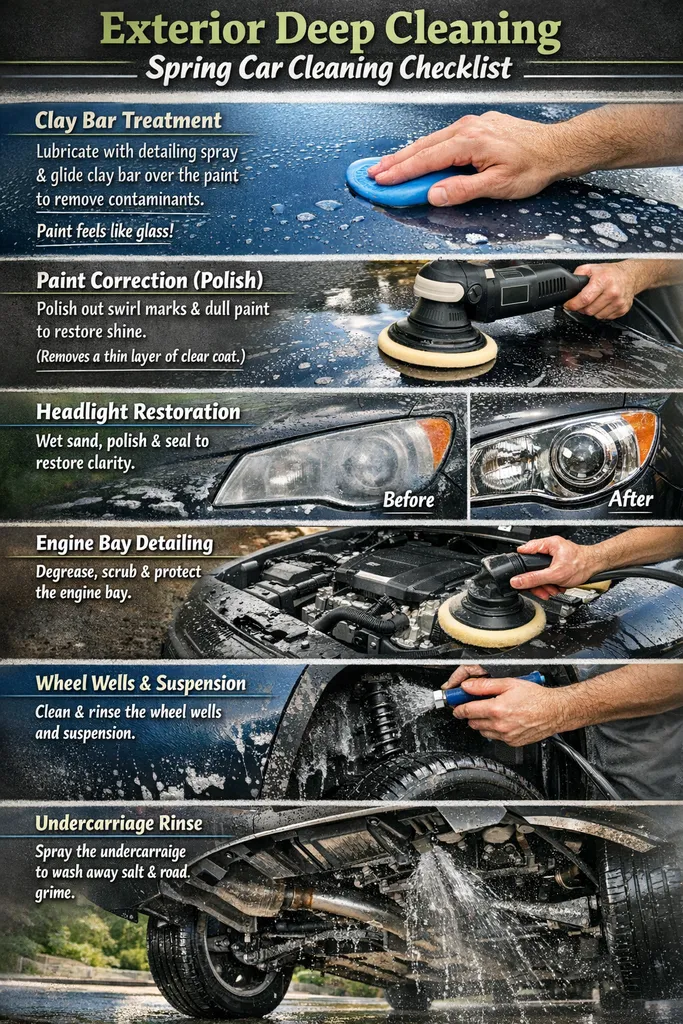
Clay Bar Treatment
Once washed, run a clay bar with detailing spray across the paint. Once it pulls out the embedded industrial fallout, rail dust, and tree sap sap from the clear coat, you will feel it gliding effortlessly. That makes the paint feeling like glass.
Paint Correction (Polish)
If the paint is deficient, or if it has light swirl marks (spider-webbing) from winter brushes, it will be best to have a polish (by hand or machine) performed as well. PS: This is NOT wax as it removes a thin layer of clear coat to expose shine.
Headlight Restoration
Take the time to wet-sand your plastic headlights with sandpaper, starting at 800 and working to 3000 grit, polish those bad boys up. Use a UV sealant to ensure they stay clear.
Engine Bay Detailing
Cover sensitive electrical components (alternator, air intake), apply gentle degreaser to engine cover and plastic shrouds, agitate with a brush, rinse with low pressure water. Sotify with plastic protectant to renew it.
Wheel Wells and Suspension
Spray the inside of the fender liners, and suspension parts with a cleaner and scrub. Rinse off the salt and mud build up which speeds rust.
Undercarriage Rinse
For salt from winter roads: If you own a pressure washer, especially one with an undercarriage attachment (or know a trick with a garden sprinkler), use it to spray the underside of the car to wash off any remaining salt and calcium chloride.
Mechanical & Maintenance Deep Cleaning

Sunroof Drain Cleaning
- Locate the small drain holes in the corners of the sunroof channel. Use compressed air or a piece of trimmer line to clear any debris. This prevents water from backing up and leaking into your headliner during spring rains.
Door Jambs and Trunk Seals
Open all doors and the trunk. Wipe down the painted jambs and the rubber weatherstripping. Apply a silicone grease or rubber conditioner to the seals to keep them supple and prevent them from freezing next winter.
Common Car Cleaning Mistakes & How to Fix it
Here is a list of Common Car Cleaning Mistakes to avoid. Even with the best intentions, using the wrong technique can turn your spring detail into a trip to the body shop.
Washing Mistakes
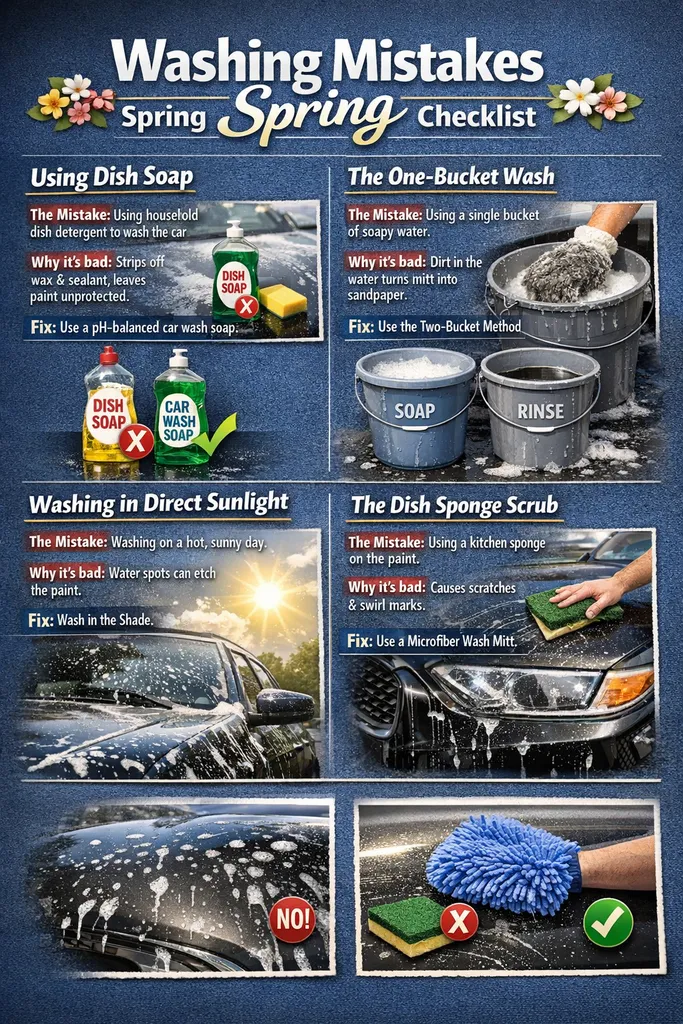
Using Dish Soap
- The Mistake: Using household dish detergent to wash the car.
- Why it’s bad: Dish soap is designed to strip grease and will aggressively strip off any protective wax or sealant, leaving the paint unprotected.
- Fix: Always use a pH-balanced car wash soap.
The One-Bucket Wash
- The Mistake: Using a single bucket of soapy water for the entire wash.
- Why it’s bad: As soon as you dip the dirty mitt back in, you contaminate the soap with grit, turning your wash mitt into sandpaper.
- Fix: Always use the two-bucket method (one for soap, one for rinsing the dirt).
Washing in Direct Sunlight
- The Mistake: Washing or drying the car on a hot, sunny day.
- Why it’s bad: Soap and water dry instantly, leaving stubborn mineral deposits (water spots) that can etch into the paint.
- Fix: Wash in the shade or during cooler morning/evening hours.
The Dish Sponge Scrub
- The Mistake: Using a kitchen sponge (especially the green scrubby side) to clean paint.
- Why it’s bad: Kitchen sponges are abrasive and will leave thousands of fine scratches (swirl marks) in the clear coat.
- Fix: Use a plush microfiber wash mitt or lambswool mitt.
Drying Mistakes
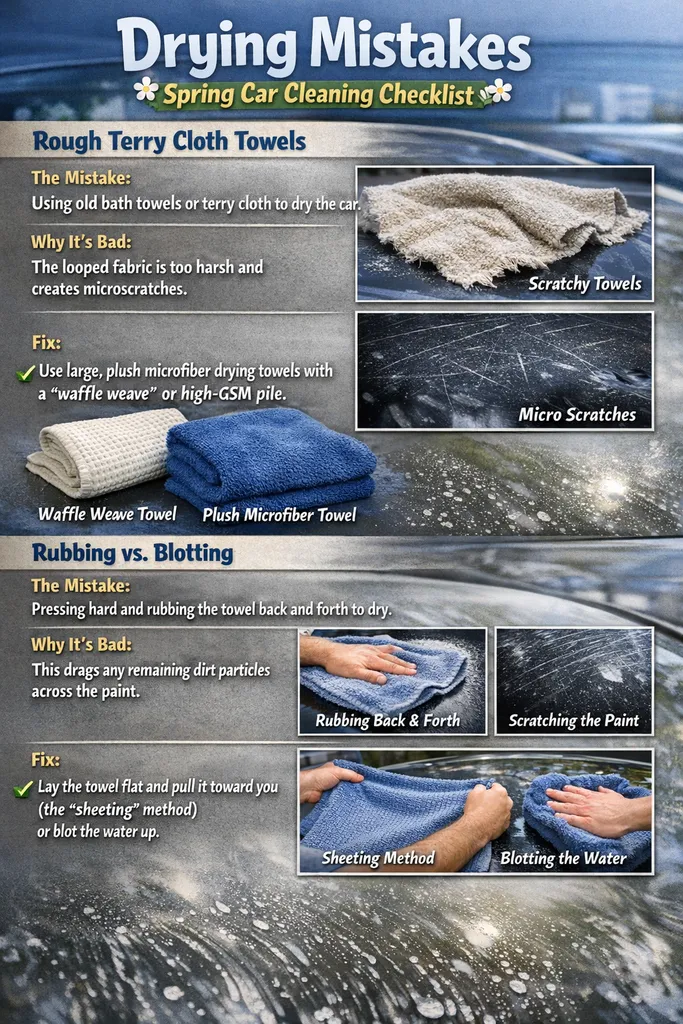
Rough Terry Cloth Towels
- The Mistake: Using old bath towels or terry cloth to dry the car.
- Why it’s bad: The looped fabric is too harsh and creates microscratches.
- Fix: Use large, plush microfiber drying towels with a “waffle weave” or high-GSM pile.
Rubbing vs. Blotting
- The Mistake: Pressing hard and rubbing the towel back and forth to dry.
- Why it’s bad: This drags any remaining dirt particles across the paint.
- Fix: Lay the towel flat and pull it toward you (the “sheeting” method) or blot the water up.
Interior Mistakes
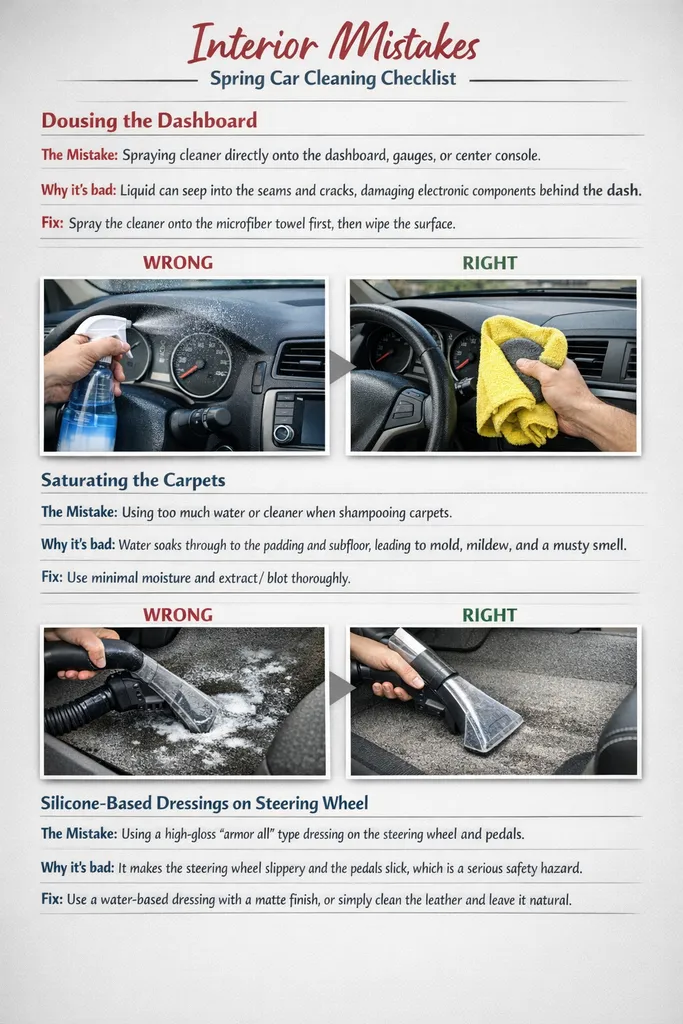
Dousing the Dashboard
- The Mistake: Spraying cleaner directly onto the dashboard, gauges, or center console.
- Why it’s bad: Liquid can seep into the seams and cracks, damaging electronic components behind the dash.
- Fix: Spray the cleaner onto the microfiber towel first, then wipe the surface.
Saturating the Carpets
- The Mistake: Using too much water or cleaner when shampooing carpets.
- Why it’s bad: Water soaks through to the padding and subfloor, leading to mold, mildew, and a musty smell that is nearly impossible to remove.
- Fix: Use minimal moisture and extract/ blot thoroughly.
Silicone-Based Dressings on Steering Wheel
- The Mistake: Using a high-gloss “armor all” type dressing on the steering wheel and pedals.
- Why it’s bad: It makes the steering wheel slippery and the pedals slick, which is a serious safety hazard.
- Fix: Use a water-based dressing with a matte finish, or simply clean the leather and leave it natural.
Wheel & Tire Mistakes
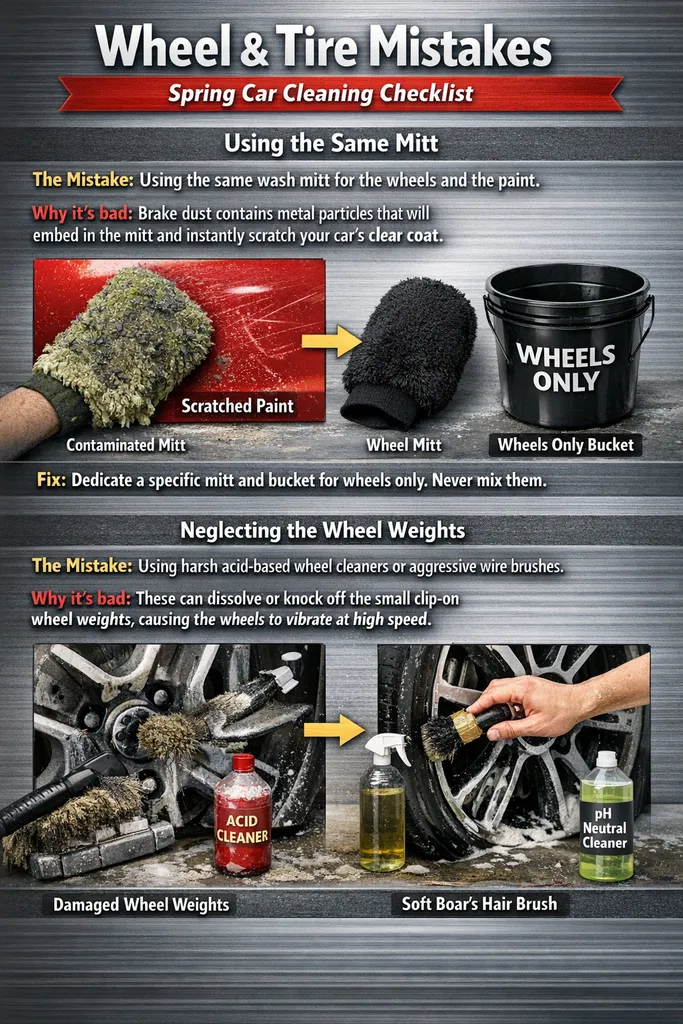
Using the Same Mitt
- The Mistake: Using the same wash mitt for the wheels and the paint.
- Why it’s bad: Brake dust contains metal particles that will embed in the mitt and instantly scratch your car’s clear coat.
- Fix: Dedicate a specific mitt and bucket for wheels only. Never mix them.
Neglecting the Wheel Weights
- The Mistake: Using harsh acid-based wheel cleaners or aggressive wire brushes.
- Why it’s bad: These can dissolve or knock off the small clip-on wheel weights, causing the wheels to vibrate at high speed.
- Fix: Use a pH-neutral wheel cleaner and a soft boar’s hair brush.
The “Quick Detailer” Traps
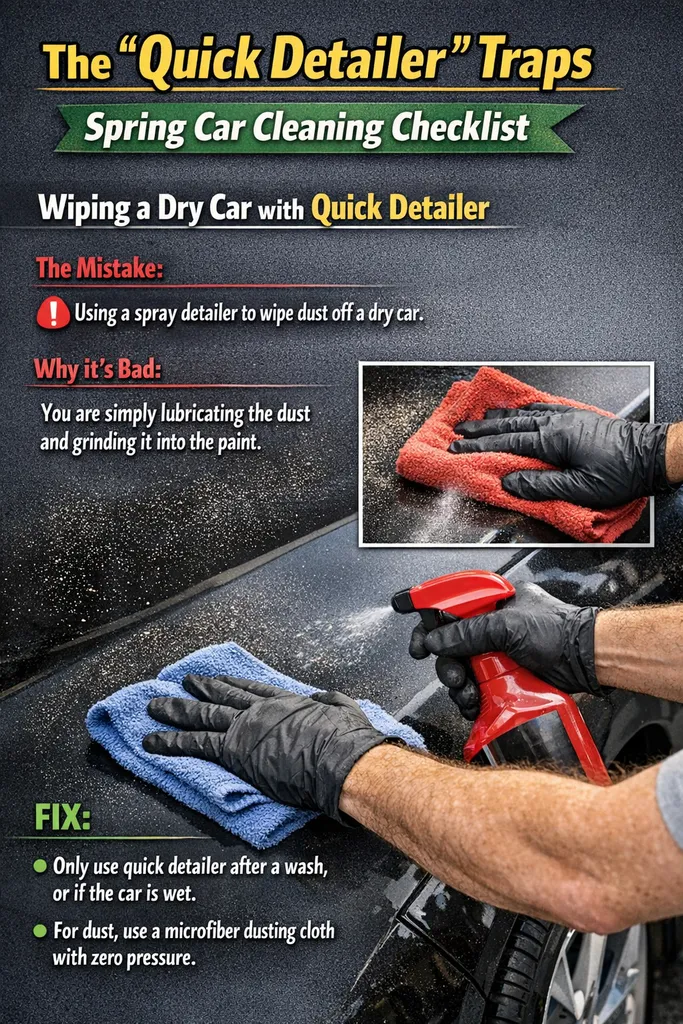
Wiping a Dry Car with Quick Detailer
- The Mistake: Using a spray detailer to wipe dust off a dry car.
- Why it’s bad: You are simply lubricating the dust and grinding it into the paint.
- Fix: Only use quick detailer after a wash, or if the car is wet. For dust, use a microfiber dusting cloth with zero pressure.
Mechanical Mistakes
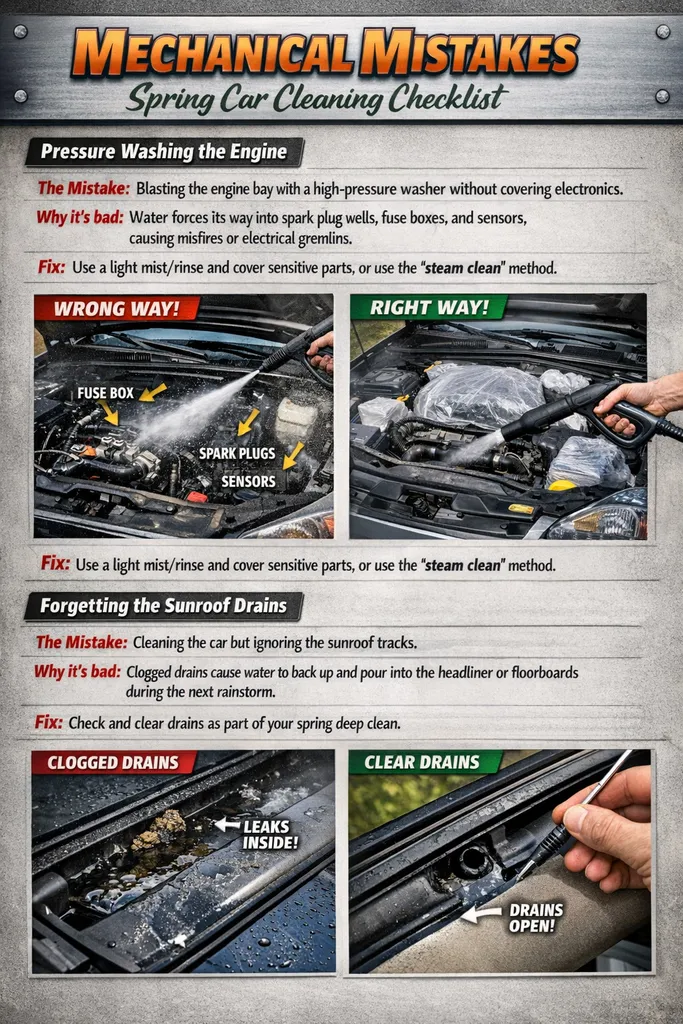
Pressure Washing the Engine
- The Mistake: Blasting the engine bay with a high-pressure washer without covering electronics.
- Why it’s bad: Water forces its way into spark plug wells, fuse boxes, and sensors, causing misfires or electrical gremlins.
- Fix: Use a light mist/rinse and cover sensitive parts, or use the “steam clean” method.
Forgetting the Sunroof Drains
- The Mistake: Cleaning the car but ignoring the sunroof tracks.
- Why it’s bad: Clogged drains cause water to back up and pour into the headliner or floorboards during the next rainstorm.
- Fix: Check and clear drains as part of your spring deep clean.
Recommended Car Cleaning Products
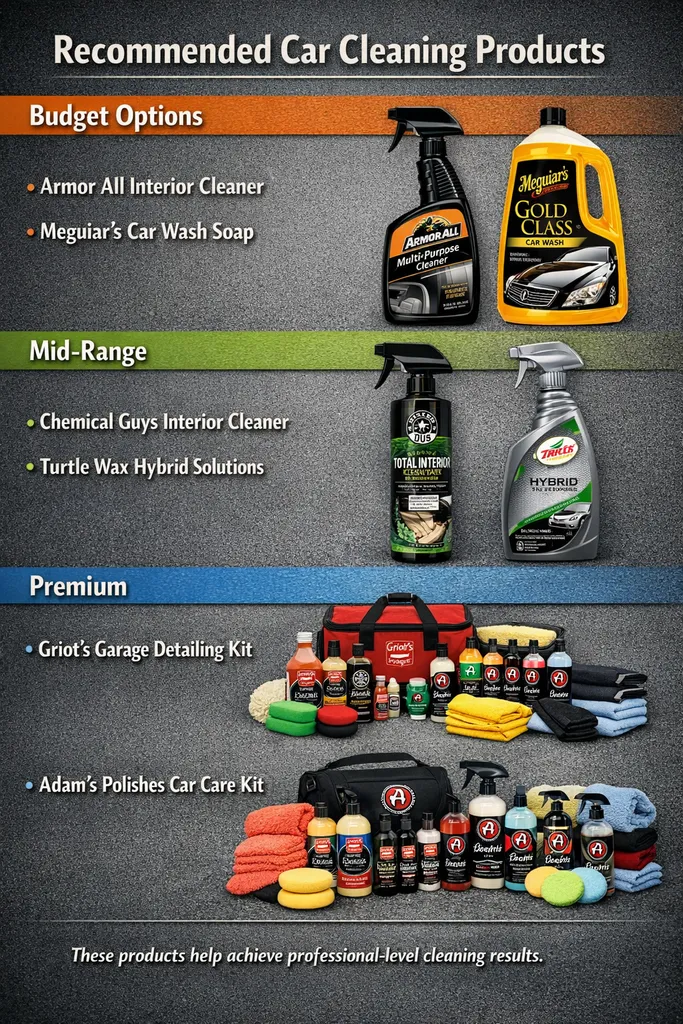
Budget Options
- Armor All Interior Cleaner
- Meguiar’s Car Wash Soap
Mid-Range
- Chemical Guys Interior Cleaner
- Turtle Wax Hybrid Solutions
Premium
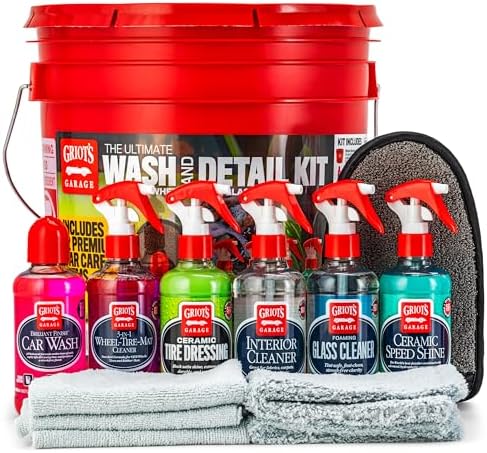
- Griot’s Garage Detailing Kit
- Adam’s Polishes Car Care Kit
These products help achieve professional-level cleaning results.
FAQ
1. Why is spring the best time for deep cleaning?
At the end of winter, there is salt, sand, mud and moisture that can harm your vehicle paint as well as its underbody. The best time to do it all and start everything fresh is spring, because after the winter months it removes that unwanted build up you need to see through for safety reasons, while also preventing long term damage to your car.
2. How do I properly wash the exterior to remove salt?
First, rinse the automobile to get rid of dark soil and salts. Also use the two-bucket method which consists of one bucket with soap, and then the second bucket with clean water to rinse your wash mitt. It stops scratching caused by dirt being wiped across the paint.
3. Why is undercarriage cleaning important?
In winter, the underbody of your vehicle picks up road salt and dirt with moisture when driving. If not cleaned, it can cause rust and corrosion on important parts. An undercarriage spray from a high-pressure rinse, or car wash will remove this hidden buildup.
4. When should I replace my windshield wiper blades?
The best time to inspect these is in the spring. Cold weather also cracks or hardens the rubber, creating streaks or ineffective wiping. The majority of experts suggest replacing the blades asoften as every six months for better visibility.
5. How do I get rid of winter cabin grime?
Begin with a thorough clean-out of all winter items including mats, tools, and debris. Vacuum all parts of the interior with special attention to seat gaps and trunk areas Then with a good interior cleaner dampen the surfaces of the dash, steering wheel, and console.
6. Should I wax my car in the spring?
Yes. In spring, waxing forms a barrier to UV rays, rain, pollen and dirt. It also facilitates future washes, as contaminants will not adhere as strongly to the paint.
7. How do I clean winter floor mats?
Use a stiff brush and water to attach the rubber mats. Vacuum carpet mats first and remove salt stains/deep contaminate them with a fabric cleaner.
8. Why should I check tire pressure as it gets warmer?
Proper tire inflation improves fuel efficiency, wet grip and for cars with a bad mechanic it helps avoid uneven wear on the tires.
9. What fluids need a spring check?
You are looking for erosion in engine oil and coolant, brake fluid, power steering fluid, and windshield washer fruit. Also spring is good for the topping of everything after stress from winters.
10. Do I really need to change my air filters?
Yes. Another known perk — You collect dust, salt particles and pollen from winter on your cabin air filters. Replacing them can help enhance airflow, AC effectiveness and also overall inside air quality.
11. How can I clean stubborn stains from upholstery?
Stick with cleaner that is suitable for the type of seat you have (fabric or leather). If you have fabric seats, baking soda can even absorb odors (you just sprinkle it on and let it sit for an hour before vacuuming).
12. Should I check my car’s battery and lights?
Yes. By spring, the cold weather has sapped battery power — a good time to check performance. In addition, clean and check all lights to be sure they can offer sufficient visibility in both spring rains and lower light conditions.
Final Verdict
Besides looking good, a vehicle that’s well-maintained lasts longer and performs better, retaining more of its value over time. One of the simplest ways to rejuvenate your vehicle after being exposed to months of winter weather is by following a spring car cleaning checklist.
Road salt, mud, and dust all build up throughout the cold months of the year on both the inside and outside of your car. Failing to clean up these elements can result in corrosion, bad smells, and worn-out surfaces over time.
A few hours spent on a proper spring cleaning routine can help restore your car’s shine, improve cabin comfort and protect significant components all in one go. Simple tasks, such as vacuuming the interior, washing the exterior, cleaning wheels and putting on some wax can dramatically improve your vehicle’s look and longevity.
And the best part is, you don’t need costly equipment or professional detailing services. With this guide and some simple tools, anyone can get great results at home.
In the end, having a clean car isn’t simply about looks—it’s about preservation, comfort and pride of ownership.” Beginning your spring cleaning routine today means you can drive around in a car that feels refreshed, looks shiny, and receives protection all year round.
Leave a Reply